Those who regularly follow my blog know that I see cloud as a great unknown when it comes to data protection. It’s still an evolving model, and many cloud vendors take the process of backup and data protection a little to cavalierly – pushing it onto the end users. Some supposedly “enterprise” vendors won’t even let you see what their data protection options are, until you sign an NDA.
Recently I’ve been working with a cloud service provider to build a fairly comprehensive backup model, and it’s greatly reassuring to see companies starting to approach cloud with a sensible, responsible approach to data protection processes. It’s a good change to witness, and it’s proven to me that my key concerns with data protection in the cloud originated from poor practices. Take that problem away, and cloud data protection becomes a lot better.
Stepping back from the enterprise level, one thing I’m quite cognisant of as a “backup expert” is designing my own systems for recovery. I have a variety of backup options in use that provide local protection, but providing off-site protection is a little more challenging. Removable hard-drives stored elsewhere exist more for disaster recovery purposes – best used for data that doesn’t change frequently, or for data you don’t need to recover instantly – such as media.
Inevitably though, for personal backups that are off-site as quickly as possible, cloud represents an obvious option, so long as your link is fast enough.
Some time ago, I used Mozy, but found it somewhat unsatisfying to use. I could never quite bring myself to paying for the full service, and once they introduced their pricing changes, I was rather grateful I’d abandoned it – too pricey, and prone on the Mac at least to deciding it needed to start all backups from scratch again.
So a bit of digging around led me to Crashplan. Specifically, I chose the “CrashPlan+ Family Unlimited Monthly Subscription” option. It costs me $12 US a month – I could bring that down to an effective $6 US monthly charge by paying up-front, but I prefer the minimised regular billing option over a single, up-front hit.
Crashplan+ Family Unlimited allows me to backup as much data as I want from up to 10 computers, all tied to the same account. Since it has clients for Windows, Mac OS X, Linux and Solaris, I’m fairly covered for options. (In fact, so far I’ve only been working on getting Mac OS X clients backing up.)
On standard ADSL2, with an uplink speed currently maxing out at 600Kbps, I don’t have the luxury of backing up everything I have to a cloud provider. At last count, Darren and I have about 30TB of allocated storage at home, of which about 10TB is active storage. So, contrary to everything I talk about, I have to run an inclusive backup policy for cloud backups – I select explicitly what I want backed up.
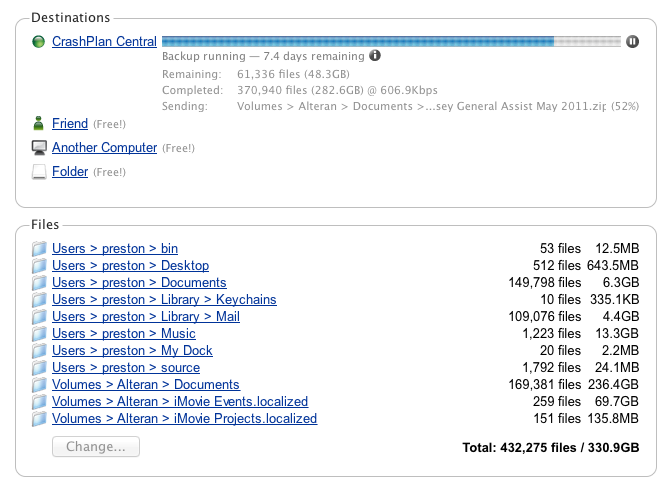
That being said, I’ve managed in the last few months, given a host of distractions, including moving house, to push a reasonable chunk of non-recreatable data across to Crashplan:
That’s the first thing I like about Crashplan – I get a weekly report showing how much data I’m protecting, how much of it has been backed up, and what machines that data belongs to. (I like reports.)
As an aside, for the purposes of backing up over a slow link where I have to be selective, I classify data as follows:
- Non-recreatable – Data that I can’t recreate “as is”: Email, documents, iTunes purchased music, etc.;
- Recreatable – Data which is a distillation of other content – e.g., the movies I’ve encoded from DVD for easy accesss;
- Archival – Data that I can periodically take archive copies of and have no urgent Recovery Point Objective (RPO) for – e.g., virtual machines for my lab, etc.
For both recreatable and archival content, the solution is to take what I describe as “local offsite” copies – offline copies that are not stored in my house are sufficient. However, it’s the non-recreatable content that I need to get truly offsite copies of. In this instance, it’s not just having an offsite copy that matters, but having an offsite copy that’s accessible relatively quickly from any location, should I need. That’s where cloud backup comes in, for me.
But there’s more than weekly reports to like about Crashplan. For a start, it intelligently handles cumulative selection. That’s where I have a large directory structure where the long-term intent is to backup the entire parent directory, but I want to be able to cumulatively add content from subdirectories before switching over. For example, I have the following parent directory on my Drobo I need to protect:
- /Volumes/Alteran/Documents
However, there’s over 200 GB of data in there, and I didn’t want a single backup to take that long to complete, so I cumulatively added:
- /Volumes/Alteran/Documents/• Sync
- /Volumes/Alteran/Documents/Backgrounds
- /Volumes/Alteran/Documents/Music
- etc
Once all of these individual subdirectories backups were complete, I could switch them off and immediately switch on /Volumes/Alteran/Documents without any penalty. This may seem like a common sense approach, but it’s not something you can assume to happen. So recently, with no net impact to the overall amount of data I was backing up, I was able to make that switch:
Crashplan offers some neat additional tricks, too. For a start, if you want, you can configure Crashplan to backup to a local drive, too. Handy if you don’t have any other backup options available. (I’m not using that functionality, but between cross-machine synchronisation with archive, Time Machine and other backup options, I’m fairly covered there already.) You can also have your friends backup to you rather than Crashplan themselves – which would be useful in a household where you want all the data to go across to Crashplan from one central computer for ease of network control:
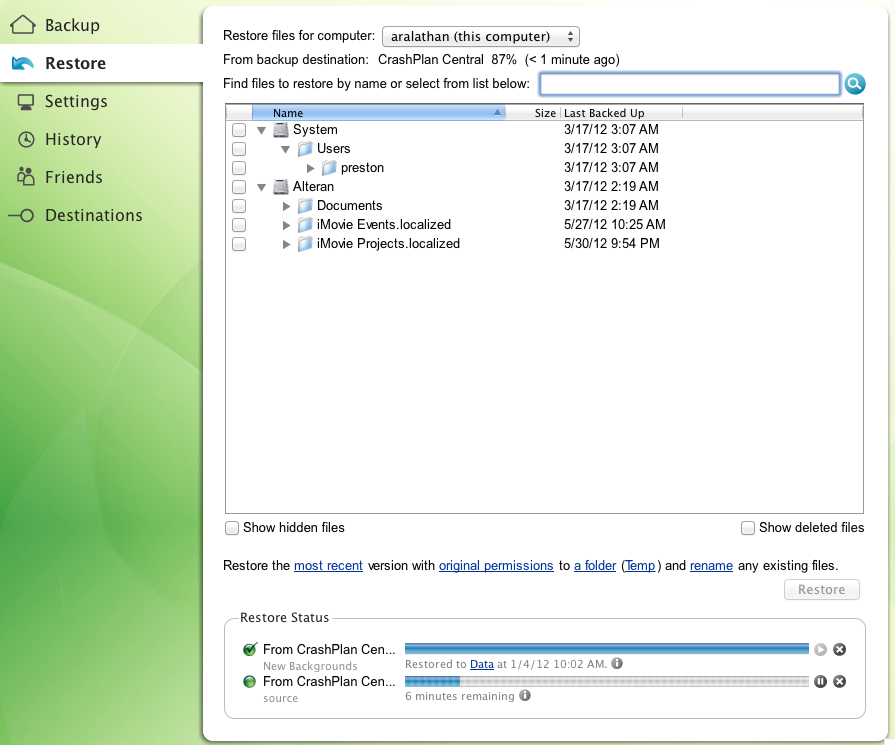
The meat of a backup product though is being able to restore data, and Crashplan performs admirably on that front. The restore interface, while somewhat plain, is straight forward and easy to understand:
One of the things I like about the recovery interface is how it leads you from one logical step to another, as evidenced by the text directly under the main file selection box:
- First choose what you want to recover
- Optionally change what version you want to recover
- Optionally change the permissions for the recovered files
- Optionally change the folder you recover to
- Choose what to do with existing files
All of these are the sorts of standard questions you’d expect to deal with, but rather than being hidden in a menu somewhere, they’re out in the open, and configured as hyperlinks to immediately draw the attention of the user.
Overall I have to say I’m fairly happy with Crashplan. I trialled it first for free, then upgraded to the Family+ plan once I saw it would suit my needs. As a disclaimer, I did have one incident where I logged a support case it took Crashplan 12 days to respond to me, which I found totally unacceptable, and poor support on their behalf, but I’ll accept it was an isolated incident on the basis of their subsequent apology and feedback from other Crashplan users via Twitter that this was a highly abnormal experience.
If you’re looking for a way of backing up your personal data where offsite and accessibility are key criteria, Crashplan is certainly a good direction to look. While the Crashplan user interface may not be as slick looking as other applications, it works, and it leads you logically from one set of selections to the next.
[Edit, 2012-12-21]
A few months have gone by since that post, and I’m now up to over 1.5TB backed up to Crashplan across 6 computers, 2 x Linux, 4 x Macs. I remain very confident in Crashplan.


1 thought on “Crashplan”