Network Attached Storage – NAS. It’s such an interesting beast, because it provides an easy solution for file storage within an enterprise that can scale into the petabytes and beyond with relative ease, while keeping administrative work down, particularly compared to traditional midrange operating systems. Yet, for so long, the thought was that the trade-off was in backup and recovery for NAS storage. To address backup and recovery of platforms that didn’t have traditional operating systems on them (or traditionally accessible operating systems on them), the Network Data Management Protocol (NDMP) was developed as an industry standard protocol to allow enterprise backup software to protect data stored on NAS appliances.
Back in the early 00s when Tape Ruled The Datacentre, NDMP could be a bit fiddly to work with. Yet, as NDMP went through generational improvements, the original wrinkles in the protocol were ironed out, and real success with NDMP came first with the notion of a 3-way backup, freeing up backup software such as NetWorker to mingle NDMP data with other backup data, and eschew the classic NDMP notion of having to dedicate backup resources just for NDMP. While a traditional NDMP backup to tape drives directly attached to a NAS filer might be single-threaded and therefore suffer all the potential risk of shoe-shining a tape, 3-way NDMP could be routed onto a tape with other savesets, getting the benefits of parallelism and tape streaming. This also made tape management easier – library sharing, and dynamic drive sharing are great solutions to a problem we don’t need to have any more. Yet, debugging NAS backups with tape was a serious head-spin so often. Backup administrators frequently didn’t have administrative access to the NAS appliances, and each NAS vendor has its own way of logging information. Debugging a hardware-induced SCSI protocol IO hang for tape was bad enough on Windows, Linux or Solaris … but adding a NAS system into the mix was a real headache.
Then came disk – staging disks, VTL, and yes, eventually, Purpose Built Backup Appliances (PBBAs), and particularly Data Domain.
So where does that leave us?

These days, NDMP is a pretty relaxing adventure compared to the 00s. Like, sit-by-a-pool-while-configuring relaxing. (In fact, it’s kind of funny that you get odd little startups claiming they do ‘data protection’ who eschew NDMP completely, insisting on doing multiple network transfers via a Windows or Linux filesystem mount, killing off any chance of securely backing up and recovering ACLs on multi-protocol shares. That’s like saying you’re a chef but then ordering everything on the menu from Uber Eats any time a customer asks for anything.)
Now that I’m in presales I talk NAS data protection a lot more than I deal with it as an implementation activity, and I thought it was high time I stepped back through the process of an NDMP configuration. It also gave me a great opportunity to check out the free (for non-prod) evaluation version of Unity – UnityVSA. I’d have liked to kick the tyres on a virtual Isilon solution as well, but I don’t quite have the home lab resources for that setup.
UnityVSA is pretty forgiving of a lightweight lab environment though, so I downloaded it and deployed it on an ESX server with 2 x 6-core CPUs, 80GB of RAM and a bunch of standalone SSDs. (The actual UnityVSA virtual machine uses 12GB of vRAM, 2 x vCPU, and using thin provisioning, around 20GB of storage after install.)
I’ve got to say, too – Unisphere is damn pretty these days:
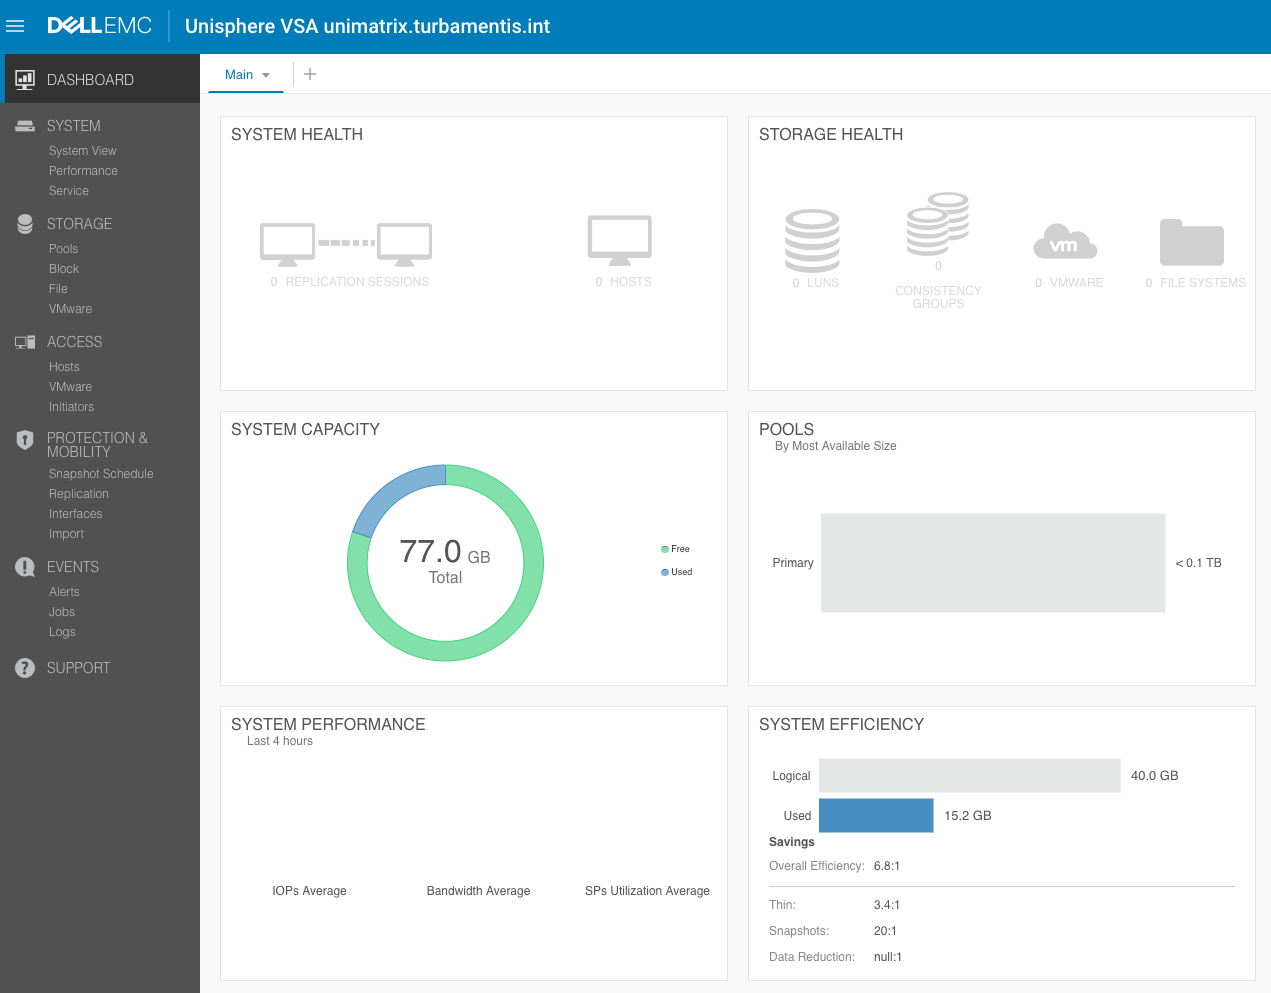
Deploying UnityVSA was really straight forward, I have to say. And, given everything that had to happen in the back-end for the initial boot and service activation, reasonably fast, too.
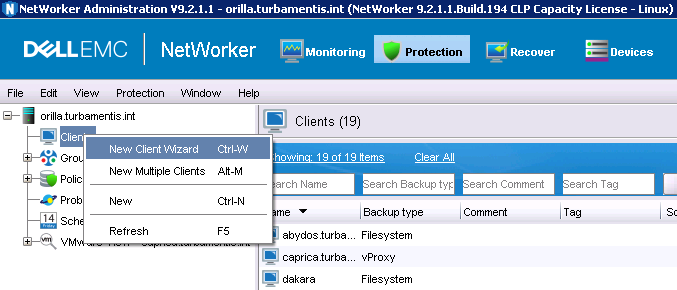
Creating a client
So, what’s involved in setting up NDMP? Well, on the UnityVSA front, it started by creating a NAS server, Filesystem and share, and enabling NDMP on the NAS server. I’m going to assume you’re wanting to start from the point you’re hitting the NetWorker console. Once you’ve got your NAS server details – hostname, NDMP credentials, etc., you’ll start by using the new client wizard in NetWorker.
In my setup, my UnityVSA install was ‘unimatrix’, so I created a NAS server on it called ‘unimatrix001’, and I’ll step you through the configuration, backup and recovery for a share on it called ‘Species8472’.
When the new client wizard appears, you enter the hostname and select the client type. In my case, that looked like the following:
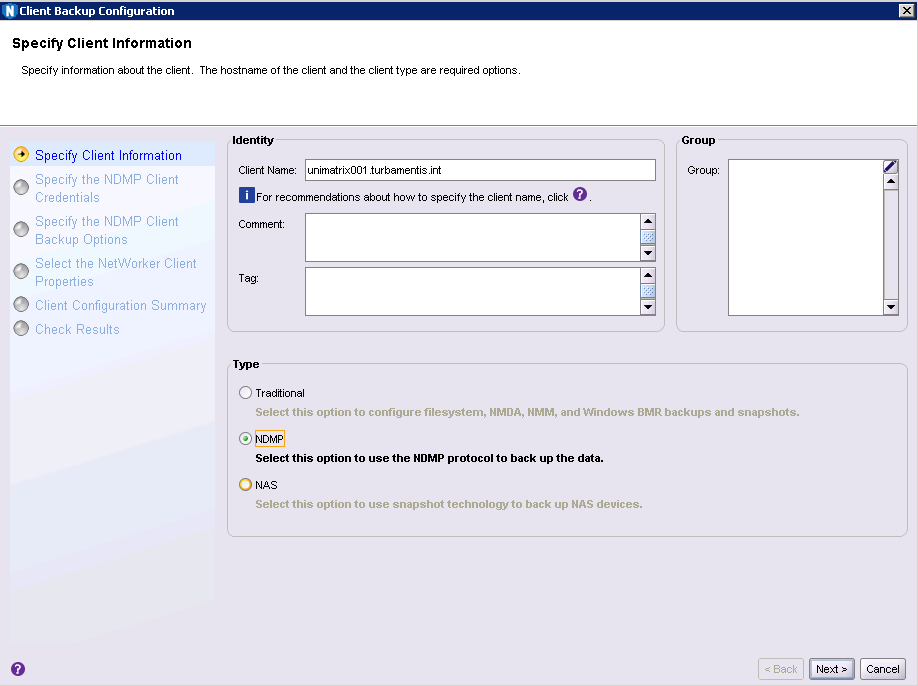
For the setup I’m working through, I just entered the client name as the NAS server created on the UnityVSA, and chose a client type of ‘NDMP’.
Note: The NAS option lets you create a NAS client that you intend to do snapshots with. I’m going to cover that in a later blog post. For now we’re going to do NDMP. Particularly for large NAS systems you’ll likely do a mix of NAS snapshot and NDMP backups.
When you’ve got those details entered, you can click Next> to continue.
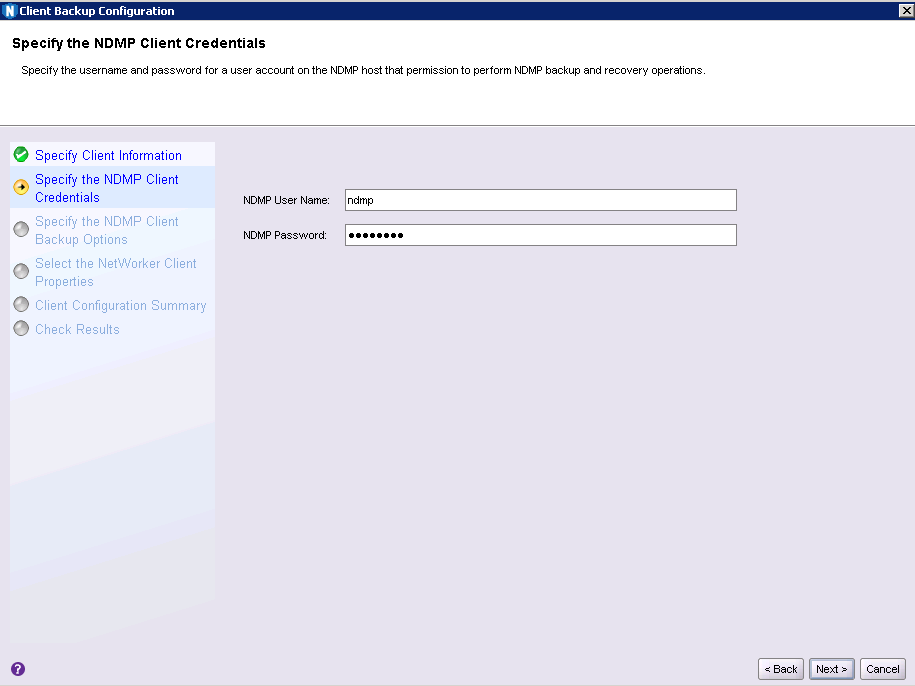
This panel is pretty straight forward – if you’re going to be working with NDMP, you need to give authorised credentials to NetWorker to communicate with the NAS system. A lot of systems will hard-code that as ‘ndmp’, but if you don’t have access to the NAS server, a storage administrator will have to get the enabled details to you. After filling those in, click Next> to continue.
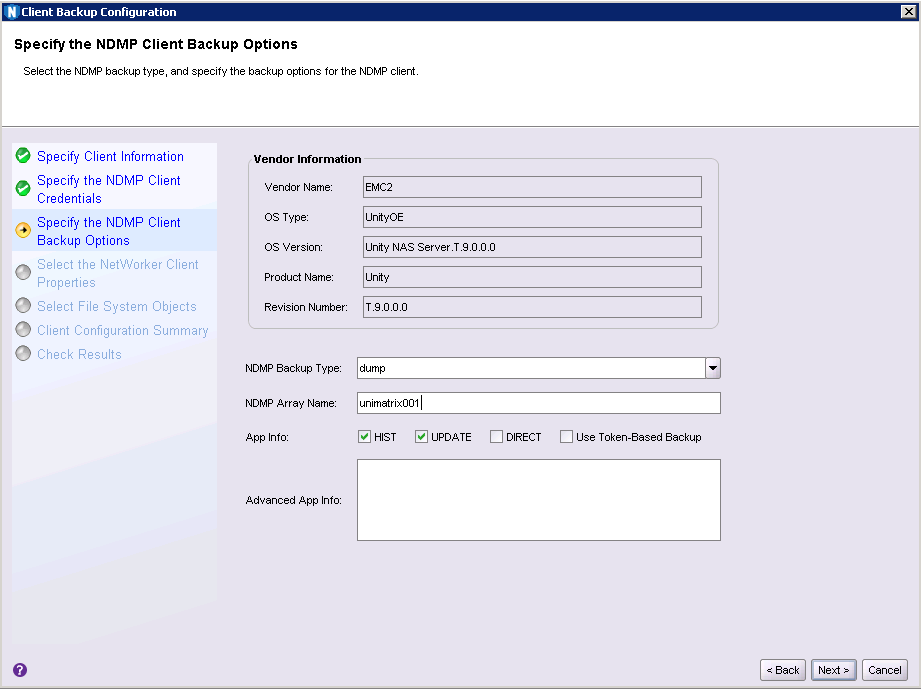
This dialog is split into two sections – the top gives you some identification details that have been pulled from the NAS system. Under, you can choose what of NDMP backup option you want – a lot of conventional NDMP backups will be of type dump, so if you’re not sure, that’s a pretty good starting point.
The DIRECT option is enabled by default. That’s for 2-way NDMP backup where the NAS server is sending data directly to locally connected tape – that’s not what I wanted, so I turned it off. The ‘NDMP Array Name’ is effectively a way of defining multiple NDMP backups for the same NAS server while ensuring they’re all indexed under the same hostname. (Useful in cluster situations, too.) So I entered ‘unimatrix001’ in that field as well. Once that was done, it was time for Next> again.
[Correction: Please see Michael Peyerl’s comment on this blog post for clarification on the DIRECT option. I stuffed that description up!]
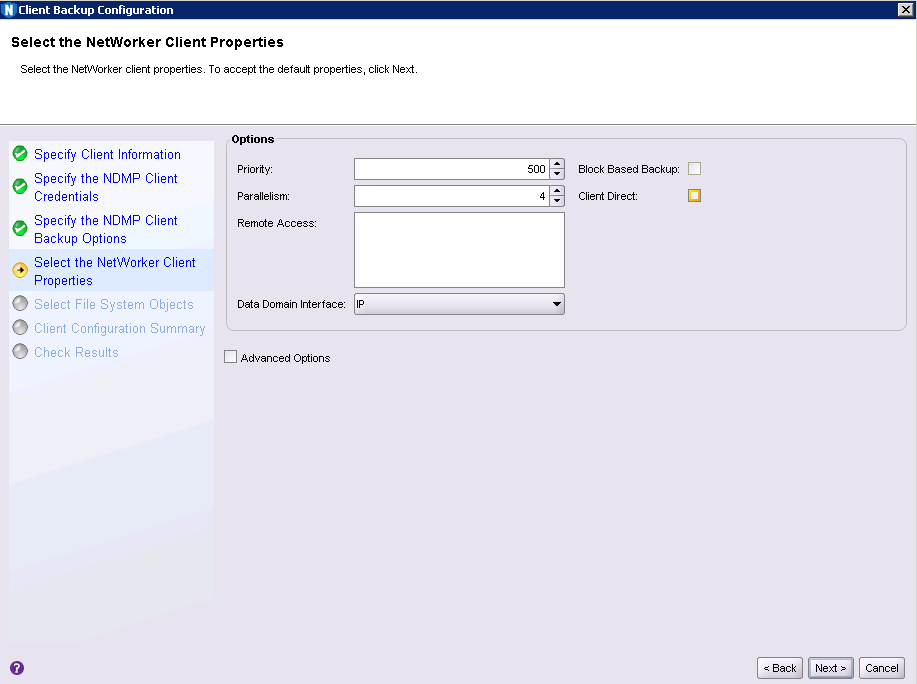
In the above dialog, we’re setting values for the NetWorker client – now, remembering there’s no client software on an NDMP host, you have to be careful to disable client direct, which is by default enabled by the wizard. Also, if you want block based backup, you can’t enable it there, you have to set the NDMP backup type on the previous page appropriately (e.g., ‘vbb’).
Note: This has a hint towards the other great feature of doing an NDMP backup via 3-way processing: traditional NDMP direct to tape from the NAS server does not support multiplexing. So if you have a dozen savesets, the only way you’re going to get multiple savesets writing simultaneously is one per tape drive. On the other hand, when a NetWorker storage node/server is receiving streams via a 3-way NDMP backup, it’s more than fine with multiplexing/writing all streams concurrently.
With client direct disabled, it was Next> to continue.
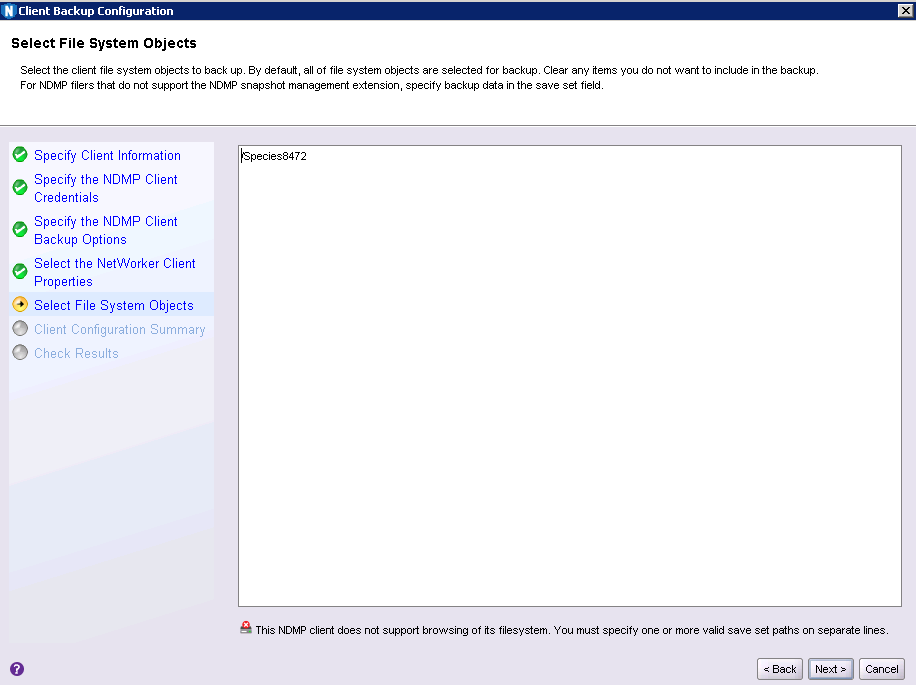
In this dialog of the wizard, you select the shares you want to backup. Even if the NAS system doesn’t permit deep-dive browsing of the filesystem, NetWorker will typically still discover the individual shares that have been presented out, and therefore contain content that you may want to backup. In my case, it was just the /Species8472 share. This is effectively the list of savesets that NetWorker will backup. So I left it as it was, and clicked Next> to continue to the summary.
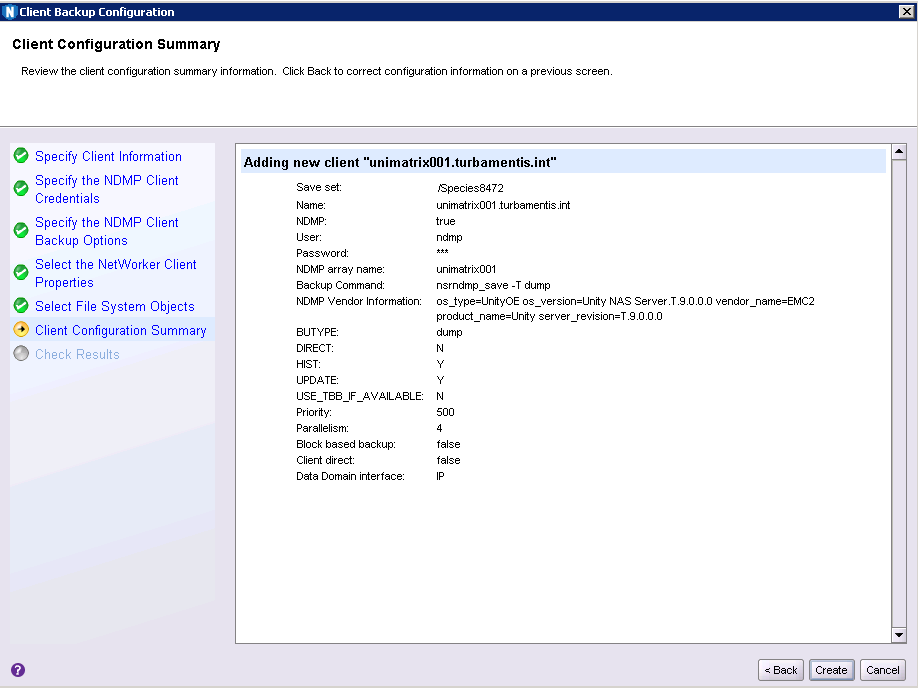
The summary pane is your chance to check and confirm details prior to actually completing the client. I was happy with the selected options, so I clicked Create.
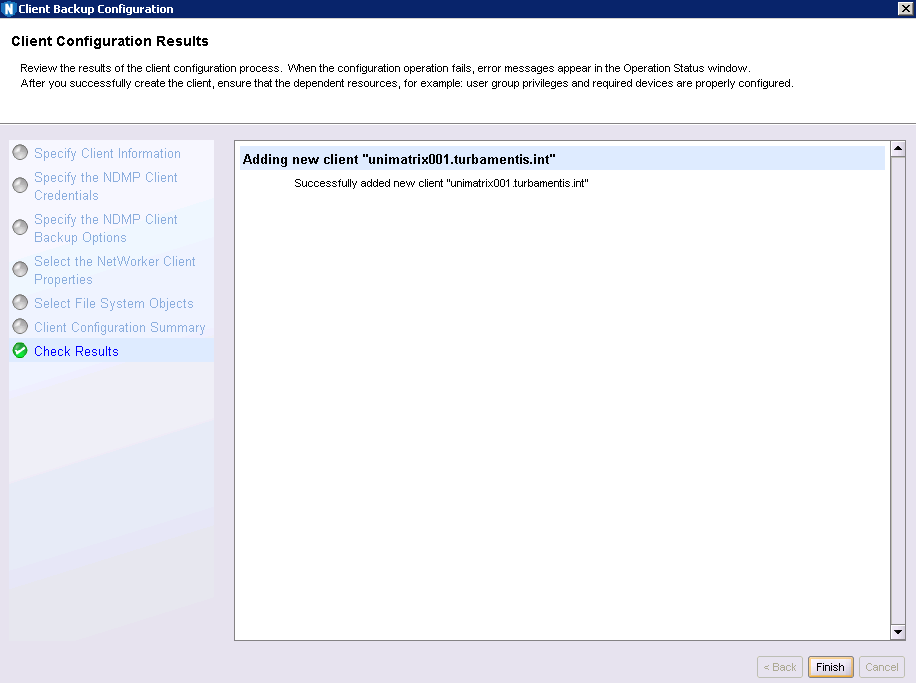
With the client created, the wizard’s dialog can be closed by clicking Finish.
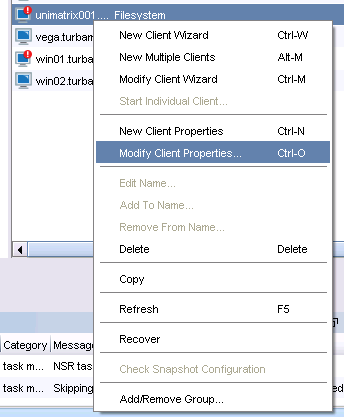
Now, the other thing to consider with NDMP is where the backup will go through – i.e., what storage node? NDMP data can’t go directly to Data Domain via a Boost API, so it will typically get routed to a storage node that’ll handle all the segmentation and deduplication. I wanted to hard set this to my backup server, so I quickly modified the NDMP client properties to force it:
To set the storage node to a specific host, go to the “Globals (2 of 2)” panel and enter the storage node(s) that NetWorker will use for that NDMP host:
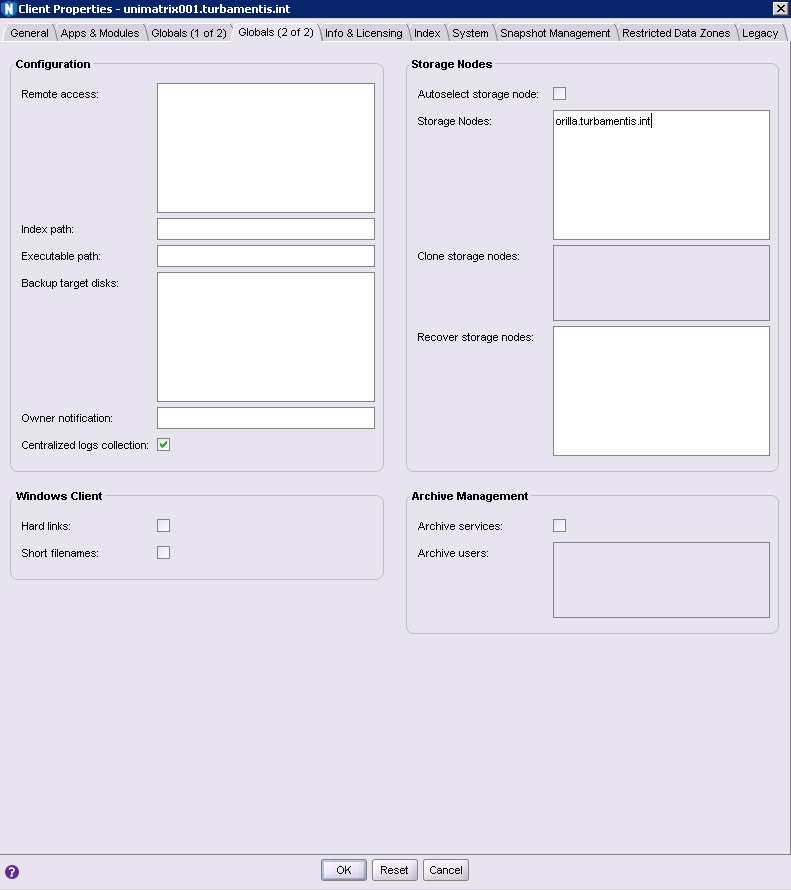
Now, also keep in mind that the NetWorker performance tuning guide does recommend you be mindful of requirements for NDMP temporary index processing; in my case, with it being a relatively small share, it was fine to leave it as the backup server itself.
Setting up a Workflow
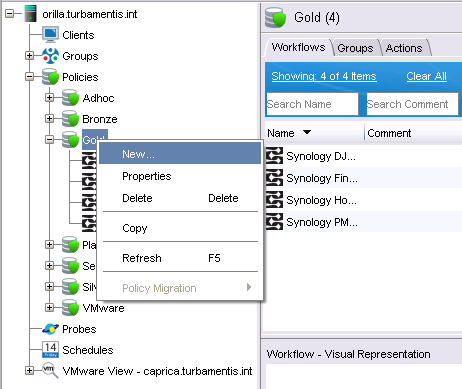
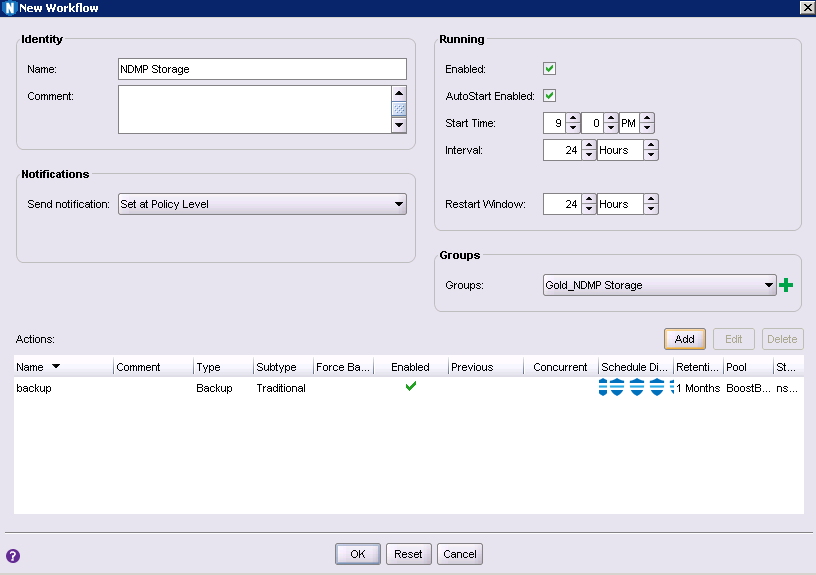
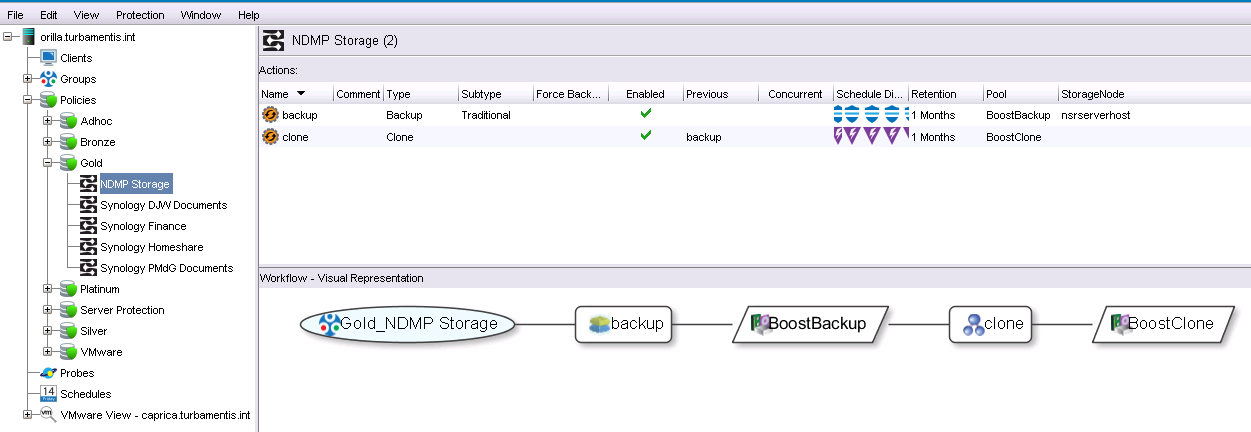
Once the client has been created, we can move on to create a policy if required, and the workflow/actions that’ll actually do the backup and cloning. I decided to just slot this backup into my Gold policy, so engaged the wizard at that point:
Once you’ve clicked New… you’ll get the policy workflow/action wizard, as follows:

For the purposes of brevity, I didn’t show the creation of the group for the workflow, but I have highlighted it in the screen capture above to remind you that you’ll need to do it. (In my case the group just simply had a single client added to it – the unimatrix001 client created in the previous section).
We’re going to add a backup and a clone workflow., so you’ll start that off by clicking the Add button. That’ll bring us to our backup workflow dialog:
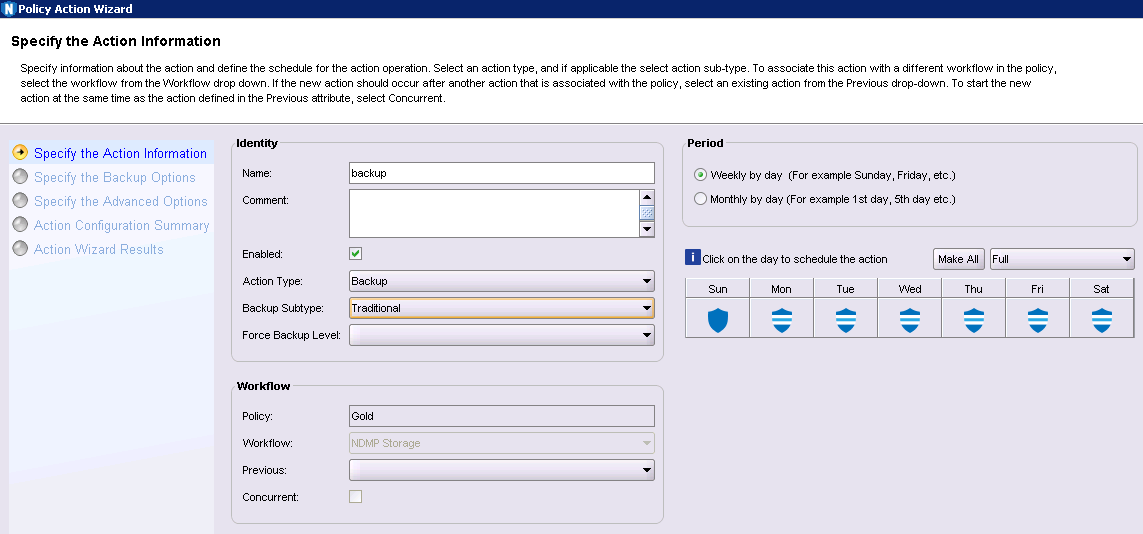
At the start of the workflow backup action, you’ll define what sort of schedule it is, whether or not it’s enabled (enabled by default), and so on. I pretty much left all options in their default setup and clicked Next> to continue.
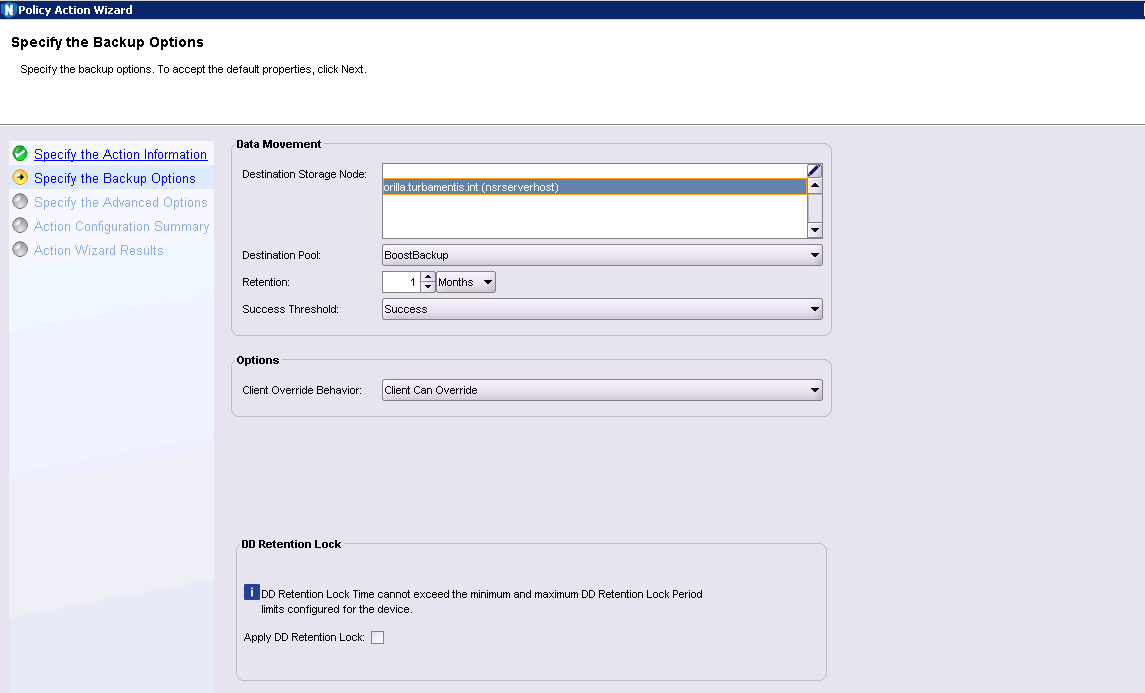
Again here there wasn’t much to change in the second panel of the dialog, other than the destination pool I wanted to write to – in this case the BoostBackup pool rather than the Default pool. After making that change, I was able to click Next> again.
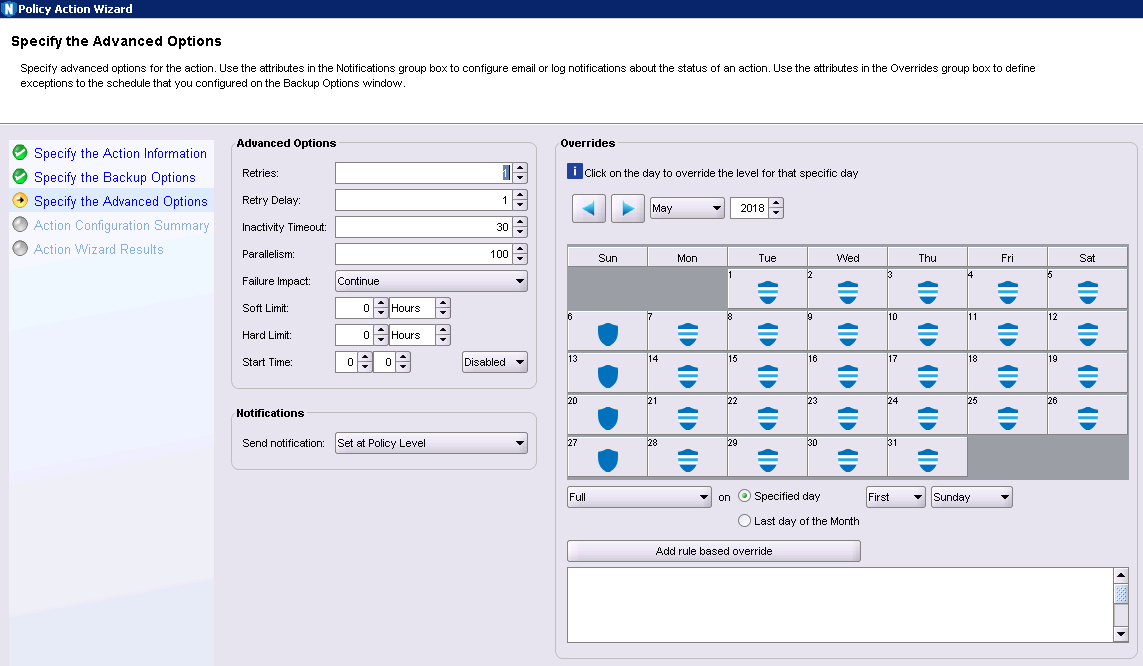
The final configuration panel for a workflow’s action lets you set details for retries, workflow parallelism, overrides, etc. I pretty much left everything and clicked Next> to continue.
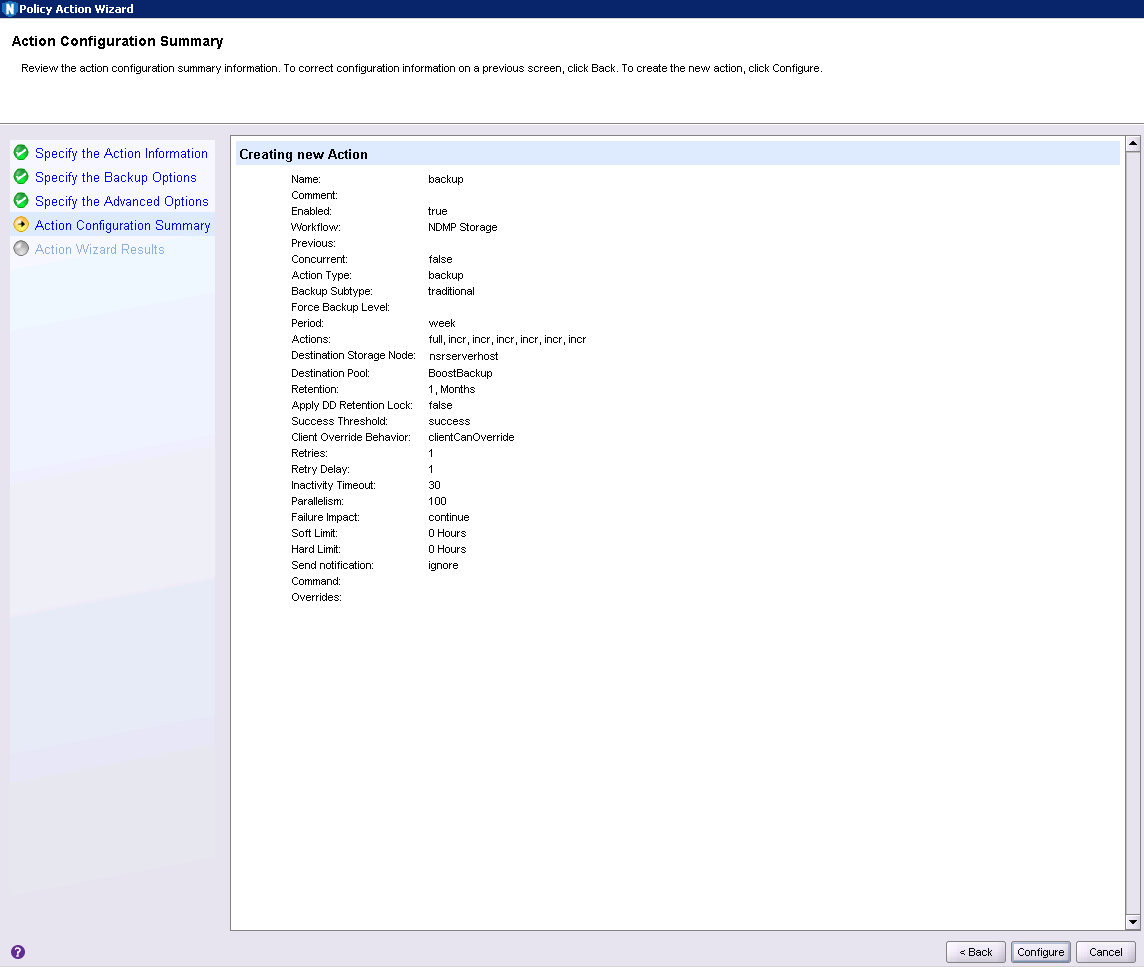
Clicking Configure there will create backup action, and let us move on to the clone action.
With the backup action created, you’re returned to the workflow dialog, and can click Add again to create a clone action. Here the options will be very straight-forward, since for cloning actions that take place after a backup you usually leave most of the configuration as-is.
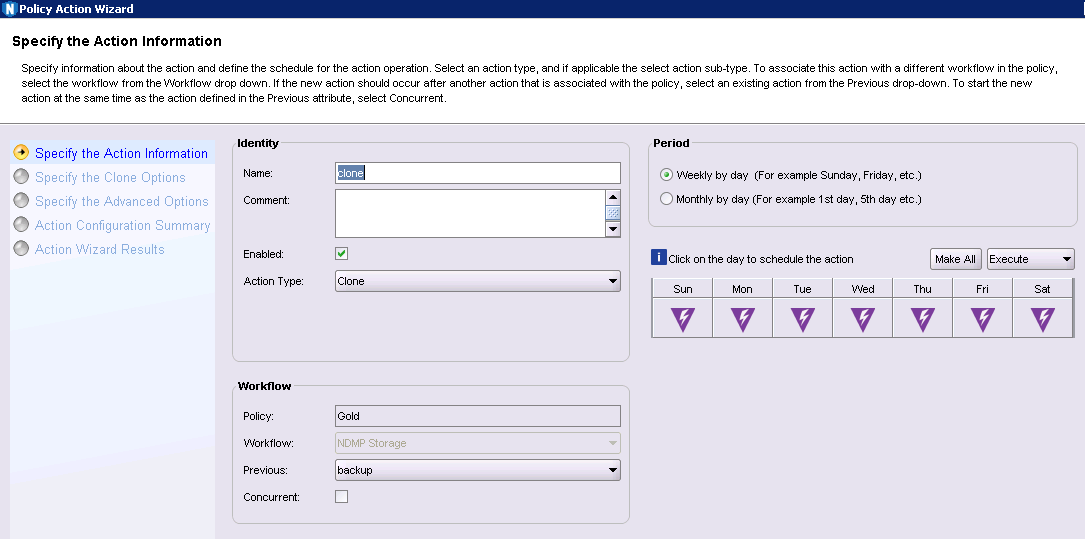
On the first page of the clone action dialog, I left everything as-is, and clicked Next> to continue on.
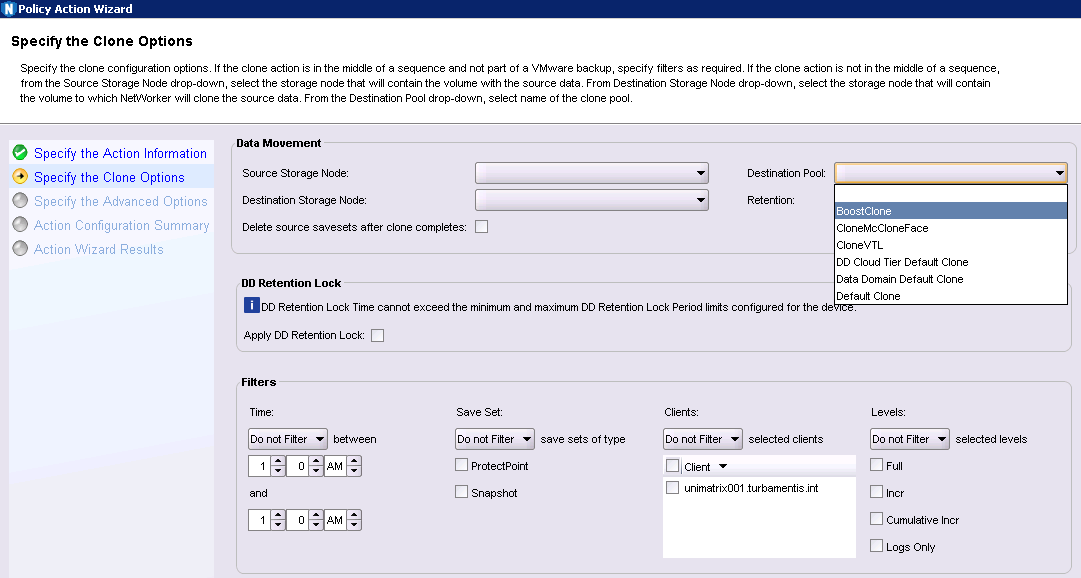
On this second panel, you get to choose cloning filters, storage nodes (useful when you want to offload cloning to a specific storage node), and the destination cloning pool – which was the one option I needed to change before clicking Next> to continue.

I had nothing to change on the advanced options panel and just pushed right on.
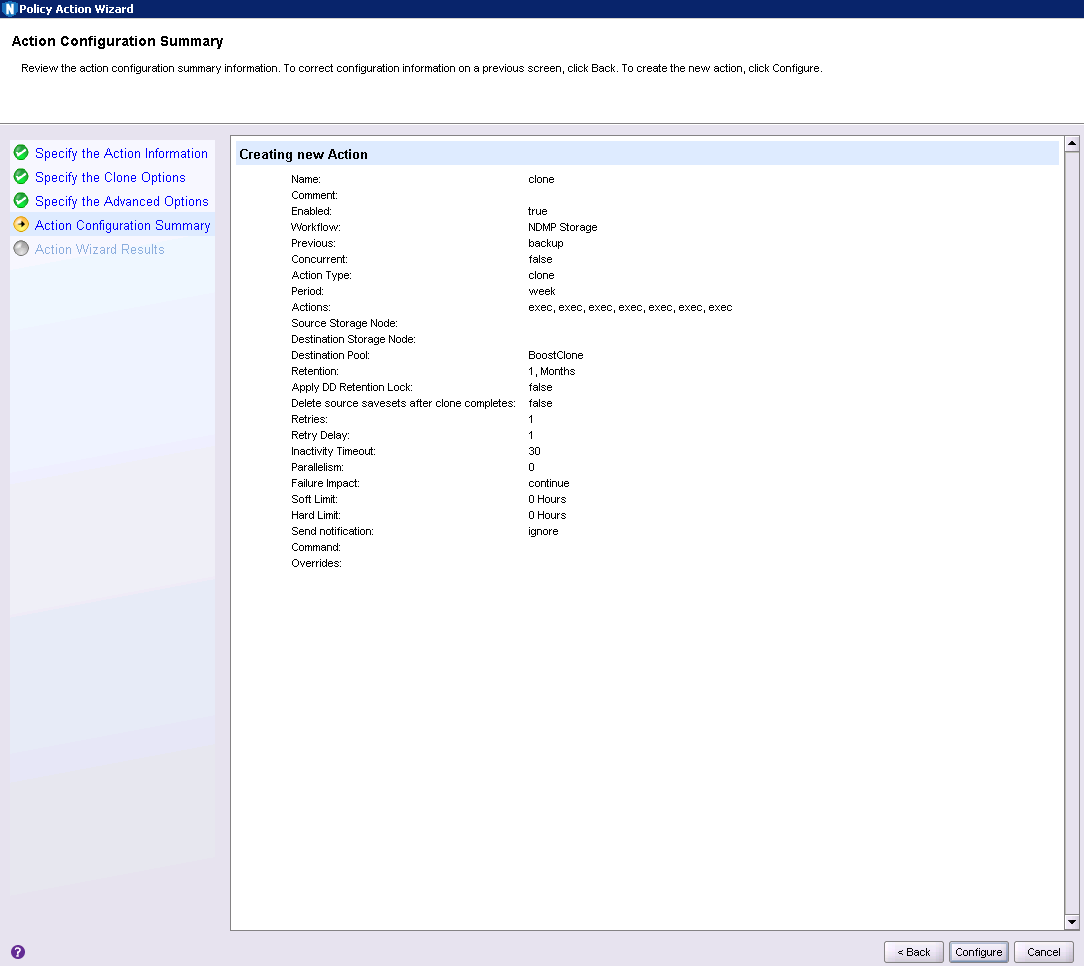
With everything ready, it was time to click Configure to proceed with the creation of the action, which left me back at the workflow, with its configuration now complete:

With that done, clicking OK closed the workflow and I could see the graphical view:
Running the backup
To run the backup, I switched over to the Monitoring tab in NMC, drilled down into the Gold policy and started the NDMP Storage workflow. In less than a minute, I was getting backup data transferring:
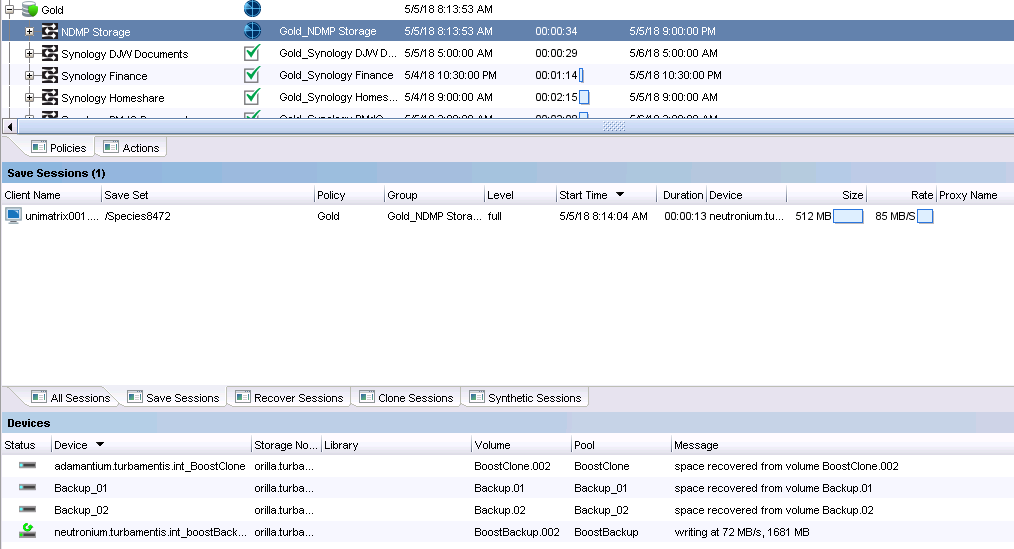
There was about 8GB of data to backup from the share, which didn’t take long as the speed it was streaming at, before we switched over to the cloning operation:
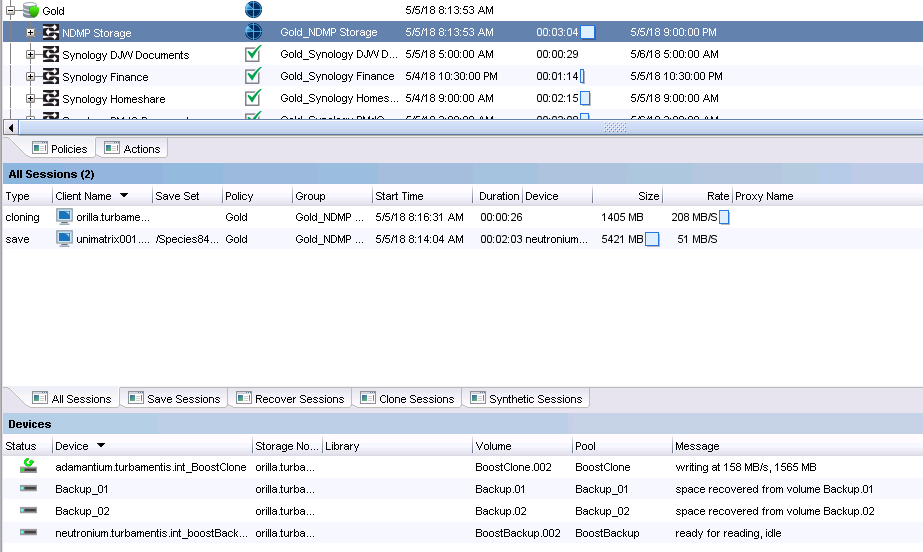
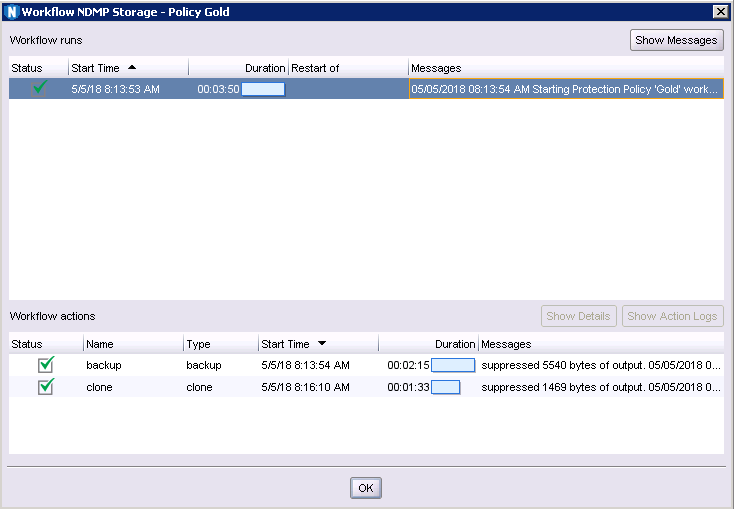
Likewise, the cloning didn’t take too long to run, and after, I was able to view the successful workflow:
Next – recovering some data!
Running the recovery
NDMP recoveries are straight-forward when using NMC, so that’s what I’ll work through for this recovery. I wanted to pull back a folder which a selection of files in it and drop them back on the NDMP server. Here’s the process that I went through.
In NetWorker Management Console, you switch over to the Recover view, then select File > New to start a new recovery process.
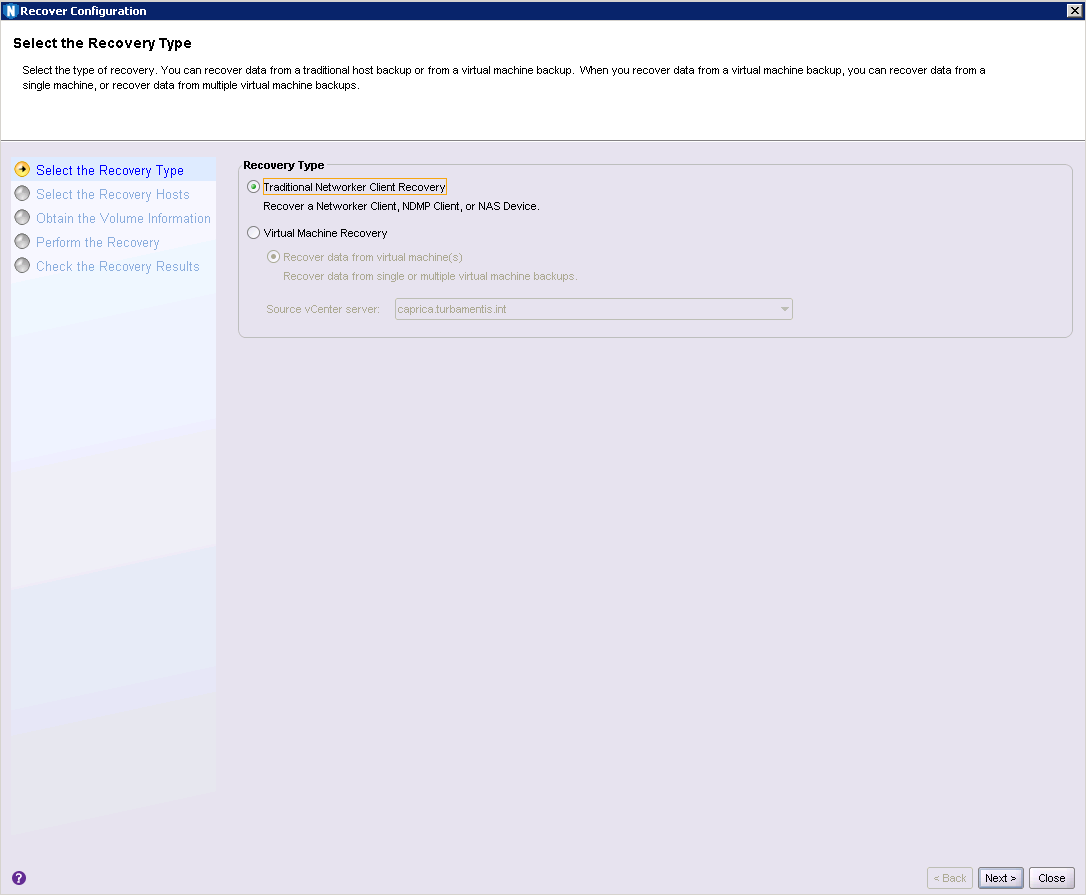
For an NDMP recovery, we stick to the Traditional NetWorker Client Recovery option, and click Next> to continue.
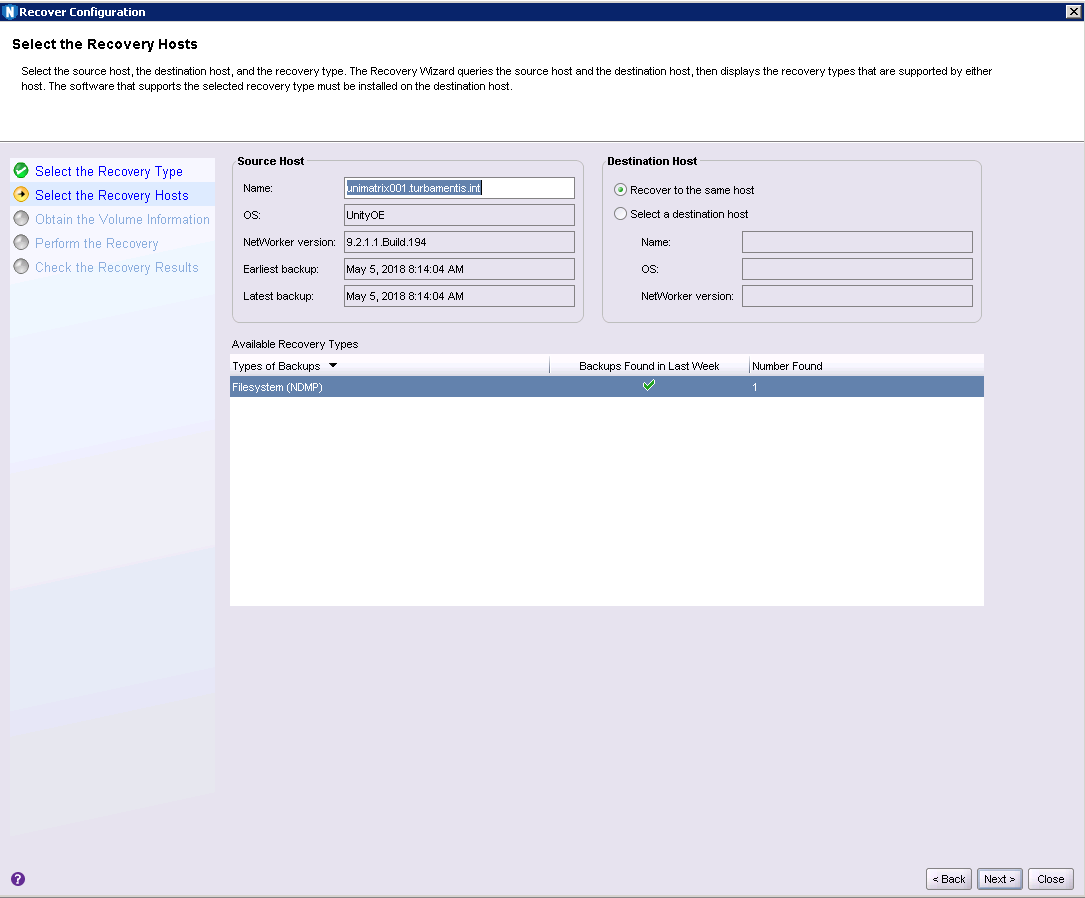
For the recovery, we have to select the client we’re going to recover from, and once you’ve entered the hostname, NetWorker will pull out some details for it and offer the recovery options. In this scenario, there were only NDMP backups in the Recovery Types, and I wanted to recover back to the same host, so I clicked Next> to continue.
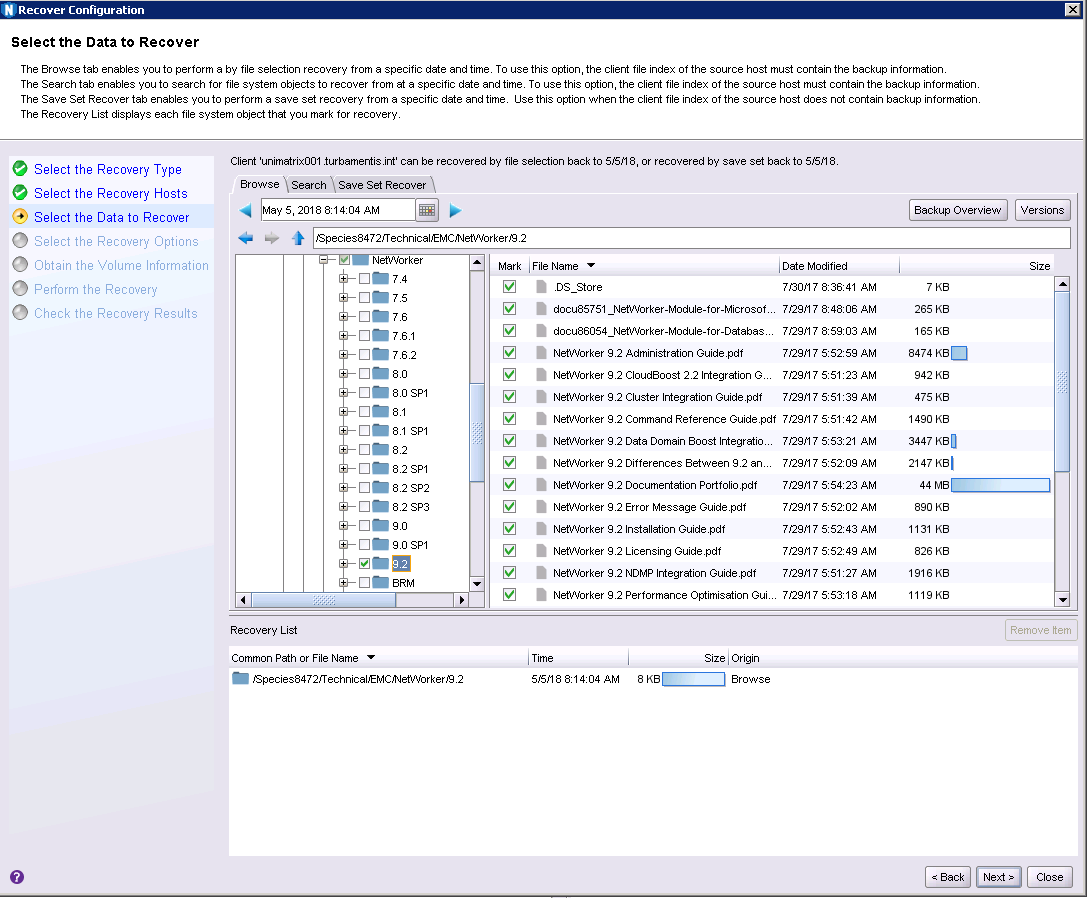
The next step is to select the files and content you need to recover; in this case, I browsed down to a folder containing NetWorker 9.2 documentation and selected that folder for recovery, then Next> to continue.
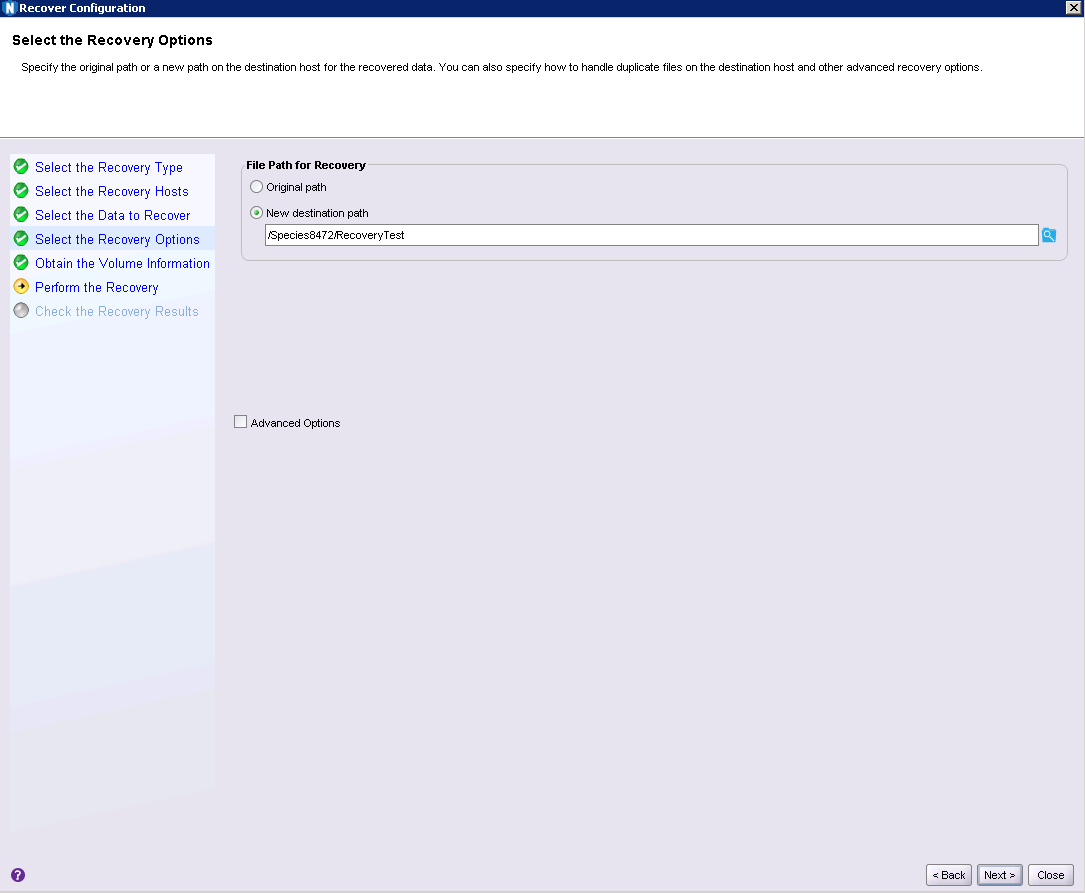
I wanted to recover the files to a slightly different path, so in this case knowing the originating share was /Species8472, I entered a destination path of /Species8472/RecoveryTest, then Next> to continue.
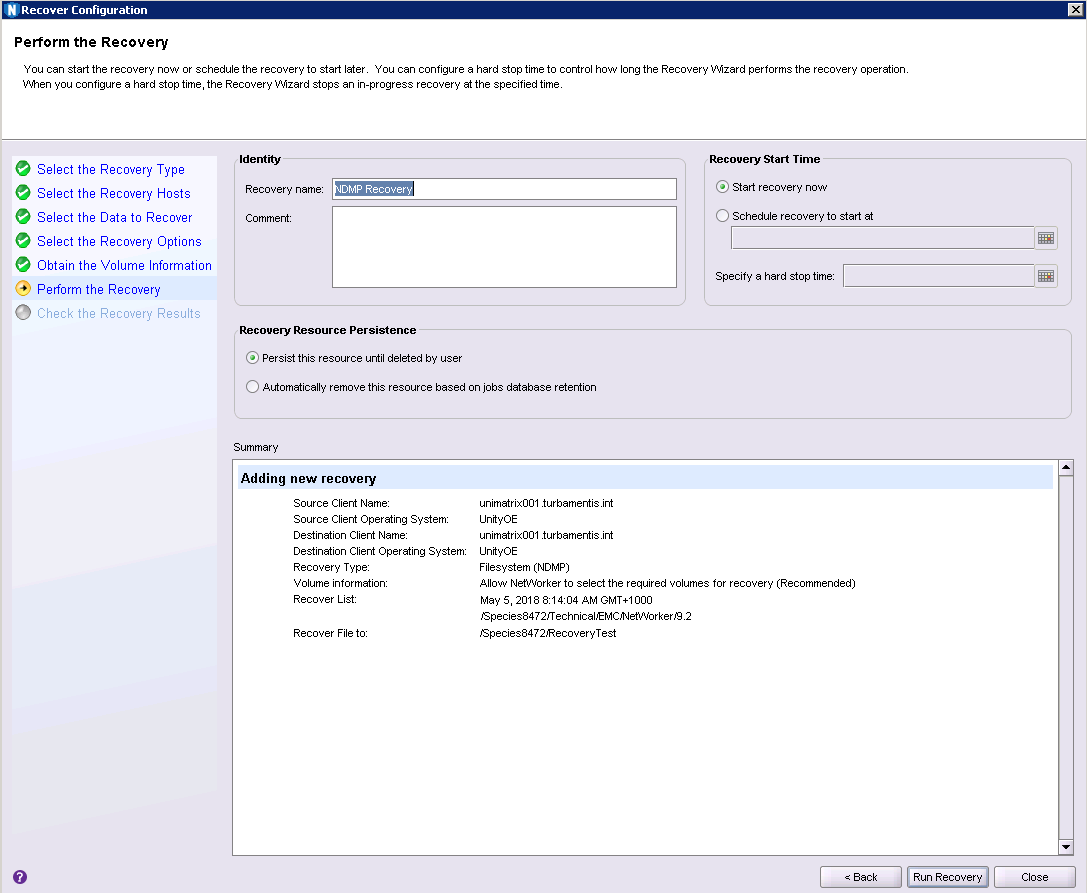
On the final dialog of the recovery wizard, you get to name the recovery, and choose when to start it, as well as verifying the options you selected during the recovery.
Tip: If you’re working in a fairly formal enterprise environment where you have to be able to report on recoveries performed, give the recovery name a prefix of the service ticket or incident number associated with the recovery request you’ve received. That’ll make it simpler for auditing/reporting purposes to articulate the reason behind that recovery.
I wanted the recovery to start straight away, so I just named it “NDMP Recovery” and clicked Run Recovery to get things underway. That brings up the recovery monitoring window:
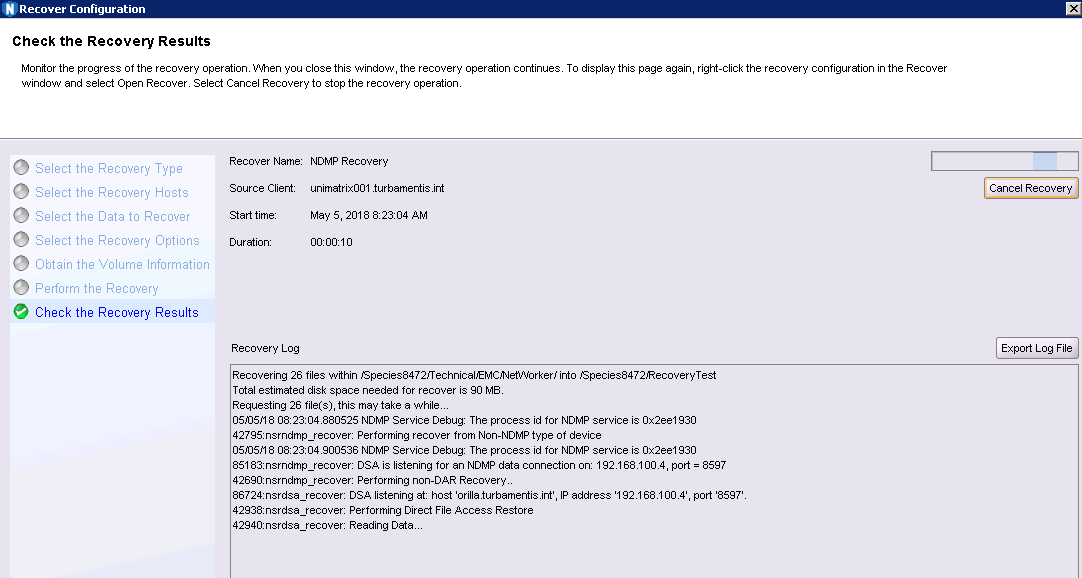
With a relatively small number of files selected for recovery, the initial setup of the recovery/initialisation of communication between NetWorker, the Data Domain, and the UnityVSA system took longer than the recovery itself took to complete:
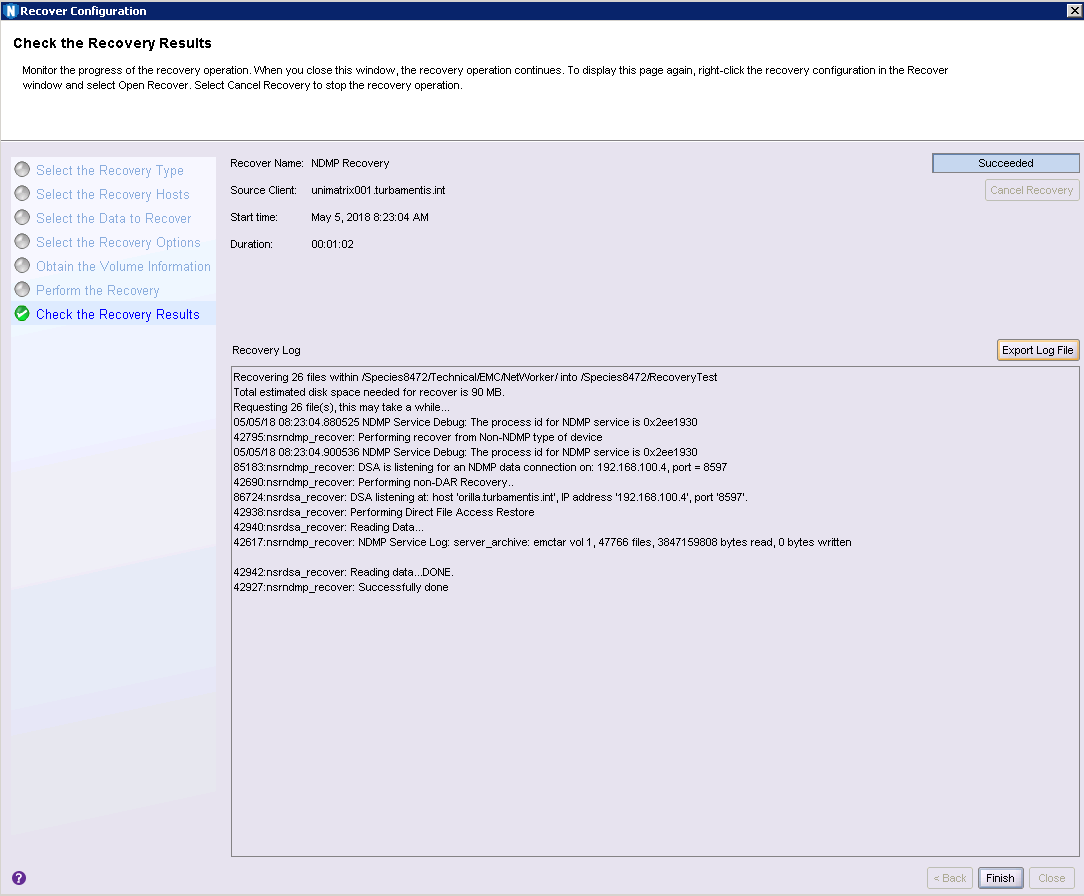
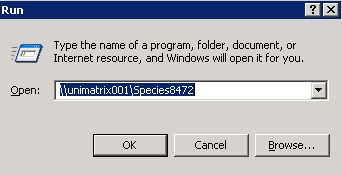
To verify the recovery was successful, I closed the recovery window by clicking Finish, then on my jump box verified that I could see the recovered files:
And there you have it – NDMP configuration, backup and recovery from start to finish. As you’d expect these days, it was a smooth and straight-forward experience – in fact, I Never Doubted My Protection would work.
If you’re interested in how to best protect NAS systems, in my book I talk more about the advantages of multi-tiered NAS server protection.
—
(Yes, I know those screen-shots are from a Windows 2003 server. Alas, Microsoft ended Technet just before I was going to start subscribing, and I’m left with my jump box running a Windows 2003, the last permanent license of Windows Server I bought.)
You wrote:
The DIRECT option is enabled by default. That’s for 2-way NDMP backup where the NAS server is sending data directly to locally connected tape – that’s not what I wanted, so I turned it off.
but
DIRECT is the option for DAR or DDAR
DAR and DDAR sends file information from the NAS filer to
the NetWorker server. This allows a single file recovery or a
directory recovery to position to the exact location of the data
on the tape media. NetWorker does not read the file and
record numbers sequentially to locate the data.
Thanks for the correction! I’m travelling at the moment, but when I’m back and able to more easily edit, I’ll adjust the blog post accordingly.
Hello. Thanks for the details and explanations.
How is your NDMP physical connectivity with UNITY VSA looks like. Is it possible to connect a Tape Library or VTL(Data Domain) to be connected with UNITY VSA. Or, are your tapes connected to Networker Server. Please advise.
I was not using tape (physical or virtual).
NetWorker can receive an NDMP stream from a NAS system, such as the Unity VSA, and then interleave that with standard backups on non-tape devices (or even tape).
(AFAIK VMware have ceased support for tape connectivity to virtual machines.)