
Introduction
Dense filesystems are, without a doubt, the bane of the average backup administrator’s life. Everything in the environment is running like a well-oiled machine until the backup agent hits that one server with tens of millions – or even hundreds of millions of files on it. And then the backup slows to a crawl. 30KB/s. 160KB/s. 0KB/s. 230KB/s. 15KB/s. It’s like watching paint dry, except paint dries faster.
I’ve been dealing with the backup consequences of dense filesystems for decades. In the late 90s, I’d go through the process of manually splitting up big filesystems to get more performance. In the early 00s, I wrote software that would at least auto-split predictable filesystem layouts, creating multiple client instances on the fly at each backup. But dealing with randomly dense filesystems has always been a challenge
Part of the challenge in even testing techniques dense filesystems is having dense filesystems to test that aren’t, you know, customer production filesystems. That’s why I wrote generate-filesystem.pl, eventually replacing it with an updated genfs2.pl that works like follows:
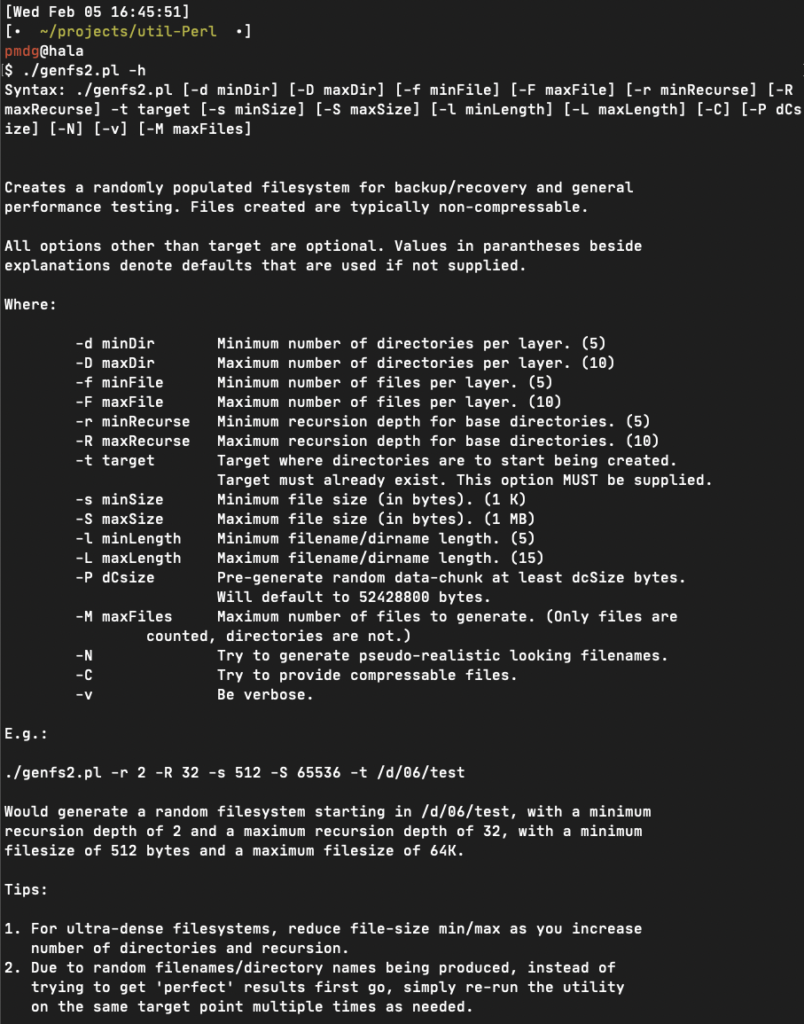
(The latest version of genfs2 is available here, by the way.)
In the past, I’ve talked about how NetWorker can do things like parallel save streams to increase the number of concurrent reads from the same filesystem (effectively, a fully automatic version of what I used to try to script in the 00s), and block-based backup – bypassing the filesystem completely.
But it was –ahem– pointed out to me a week or so ago that I’d only ever provided examples of the sorts of differences you might get in performance based on Linux. So, it was off to the land of Windows for me and my lab to see what I could do!
Setup
I created a Windows 2016 virtual machine, fully patched, sitting on SSD storage. The server had 2 x CPUs allocated (from a 2 socket, 6-cores per socket, with hyperthreading – with 2.2GHz CPUs), and 8GB of RAM. (Other than installing NetWorker 19.2, gvim and Strawberry Perl on it, it was a vanilla 2016 install.)
The backup server was a Linux CentOS 6 system running NetWorker 19.2 – it had 16GB of RAM and 2 x CPU allocated to it, and for backup storage, I was using the free DDVE 0.5TB system – also running on SSD, but a different SSD than the Windows 2016 server.
I formatted the E:\ drive using NTFS with a 1KB allocation unit size. Onto the E:\ drive, I created 10 x subdirectories, then ran genfs2 against each subdirectory, using the command:
C:\> perl genfs2.pl -d 7 -D 15 -r 5 -R 14 -f 32 -F 128 -s 1024 -S 2048 -C -N -t E:\dirXX
Where dirXX was between dir01, dir02 … dir10. The resulting filesystem consumed about 73GB of space and had 22,895,676 files in it. That definitely falls into the ultra-dense category – in fact, it took well over two days to get all those files created, even when running a few creation threads simultaneously!
But eventually, the filesystem was created and I was ready to do a backup!
Standard Filesystem Backup
OK, so I started a standard filesystem backup – just a single-threaded backup. No block-based backup (BBB) enabled, no parallel savestream (PSS) enabled.
Two days, sixteen hours and forty-three minutes later, it completed successfully. That’s obviously not ideal, but the advantage at least of doing a dense filesystem backup to disk-based devices over tape is that it does, eventually, complete!
64 hours and 43 minutes. Keep that number in mind. While the filesystem occupied 73 GB on disk, NetWorker reduced that backup in a single-threaded read to 37 GB due to space efficiency. [Note: Thanks Simon for pointing out my basic math error!]
After the backup completed, I deleted the backup in NetWorker using nsrmm, ran nsrim -X to force an immediate cleanup, and then jumped onto the Data Domain to run filesys clean start and watched that to completion before I moved onto the next test, to avoid muddying the performance testing.
Parallel Savestreams
So, on to PSS! In the past, I’ve seen stellar improvements in big filesystem backup performance, but this really is a truly dense filesystem, which changes the game a little bit.
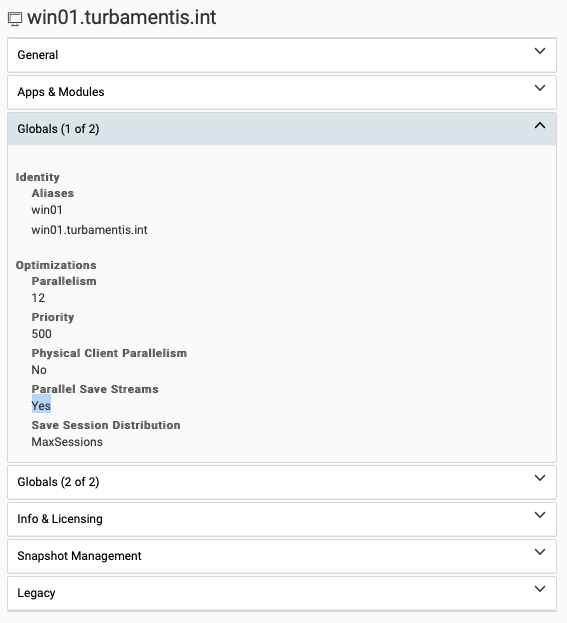
The first test was just a standard PSS enablement, which gave me four streams. It took a little over 20 hours and 40 minutes to complete. That more than halved the backup time, just by using PSS. But I wanted to see whether increasing the PSS count would give me some increased performance, so I cleared out the backups and the Data Domain filesystem again and increased PSS to its maximum – 8 concurrent streams.
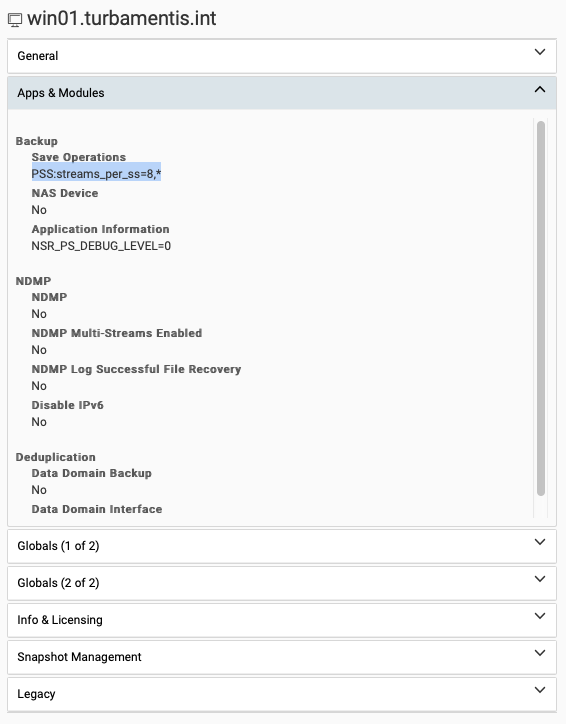
Increasing to a PSS of 8 didn’t make a huge difference in this scenario: it brought the backup down to 20 hours, 35 minutes and 16 seconds, for a backup size of 44 GB.
(I should note: that’s a ‘front end’ backup size. What was stored on the Data Domain was a lot smaller.)
Reducing a backup that took over 40 hours by half is a pretty good accomplishment. But could I do better?
Block-Based Backup
Block-based backup works by cutting the filesystem out of the equation. NetWorker engages the snapshot engine (on Windows, that’s VSS, obviously – on Linux, it can be things like LVM) to give you a crash-consistent copy of the filesystem. The problem with dense filesystems is not the backup software as such, but the cost, in time, of walking the filesystem. So when we remove the walk, we get to sprint.
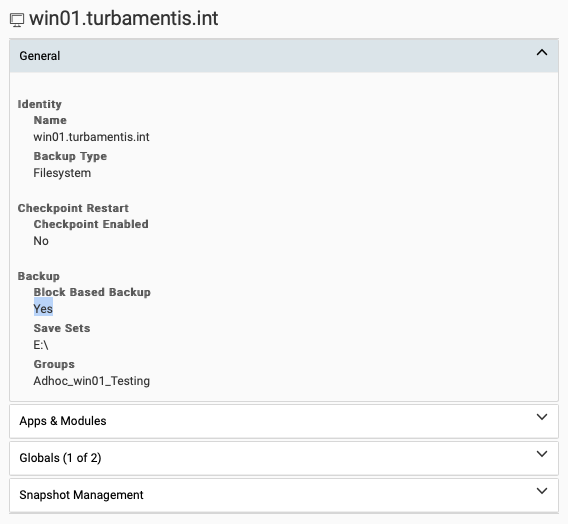
After I went through the clearing process previously described, I switched over to block-based backups – that involved turning PSS off, and enabling BBB on the initial client configuration screen:
So my first block-based backup took about 50 minutes to complete. 64, almost 65 hours down to 50 minutes is pretty good, right? Wrong! I realised the next day that while the backup had been running, the Windows server had been churning along downloading another bunch of patches. So, I cleared all the backups off my test environment, cleaned the Data Domain filesystem again, turned off automatic patching, and re-ran the backups.
Block-based backups bypass the filesystem, so you’ll get a backup equal to the total occupied size without any space-saving. (The space-saving, of course, comes in writing to Data Domain.) So this time, my backup was 73 GB and completed in 21 minutes and 47 seconds.
64 hours and 43 minutes brought down to 21 minutes and 47 seconds. That’s a nice change.
I then ran genfs2 and increased the filesystem from 22,895,76 files to 22,909,578 files. I also did a reboot of the Windows server, which will result in BBB doing a new ‘full’ backup.
Here’s the beauty of BBB though: if you specify an incremental backup but you’re writing to Data Domain, any incremental backup will get converted via Data Domain’s virtual synthetic full (VSF) operations into a full backup. So you get a full backup, at the cost of an incremental.
So here are some additional testing results:
- Post-reboot/adding files: 22,909,578 files/77 GB as a new full in 20 minutes and 31 seconds.
- Increased file-count to 22,925,289 files: 86 GB VSF in 13 minutes and 9 seconds.
- Increased file-count to 22,936,142 files: 90 GB VSF in 9 minutes and 5 seconds.
- Increased file-count to 22,955,769 files: 96 GB VSF in 11 minutes and 6 seconds.
- Forced a full new backup without changing the filesystem: Full backup in 12 minutes and 4 seconds.
- Left filesystem alone and ran a new VSF: 96 GB in 1 minute and 32 seconds.
- Increased file-count to 22,972,780 files: 101 GB VSF in 13 minutes, 22 seconds.
Effectively, our starting position of 2,443 minutes to backup a filesystem got brought down first to 22 minutes (rounded up), and eventually sat pretty consistently at the 10-13 minute mark.
Backups were literally taking less than 1% of the “standard” backup time.
Clearly, if you’ve got a physical Windows server with a dense filesystem, BBB is the way to go. But this was VMware, and I’d be remiss if I didn’t test image-based backup performance.
VMware Image-Based Backups
So I cleared out all the previous backups I’d run (nsrmm to delete, nsrim to purge, and Data Domain filesystem clean to remove all trace of the content) and switched to a VMDK backup for just the E:\ drive:
The first backup was 104 GB generated in 37 minutes and 1 second, but we all know that after the first backup has completed, subsequent virtual machine backups to Data Domain are usually a lot faster.
I ran a second backup without adding or changing any content on the E:\ drive and that completed in … 25 seconds.
Virtual machine backups are also VSF backups, so I expected that adding files to the filesystem should, like the block-based backups, result in relatively short backup times to give me a full backup image. Here’s what I got:
- Increased file-count to 23,005,668 files – 104 GB backed up in 1 minute and 13 seconds.
- Increased file-count to 23,187,078 files – 104 GB backed up in 1 minute and 31 seconds.
- Increased file-count to 23,324,495 files – 105 GB backed up in 1 minute and 19 seconds.
Wrapping Up
I wanted a way of visualising the performance benefits by dealing with dense/ultra-dense filesystems on Windows by switching away from traditional singular filesystem walks. Bar charts don’t work well on a normal linear scale though to show this sort of difference. For me, I think the best visualisation comes from an annotated treemap:
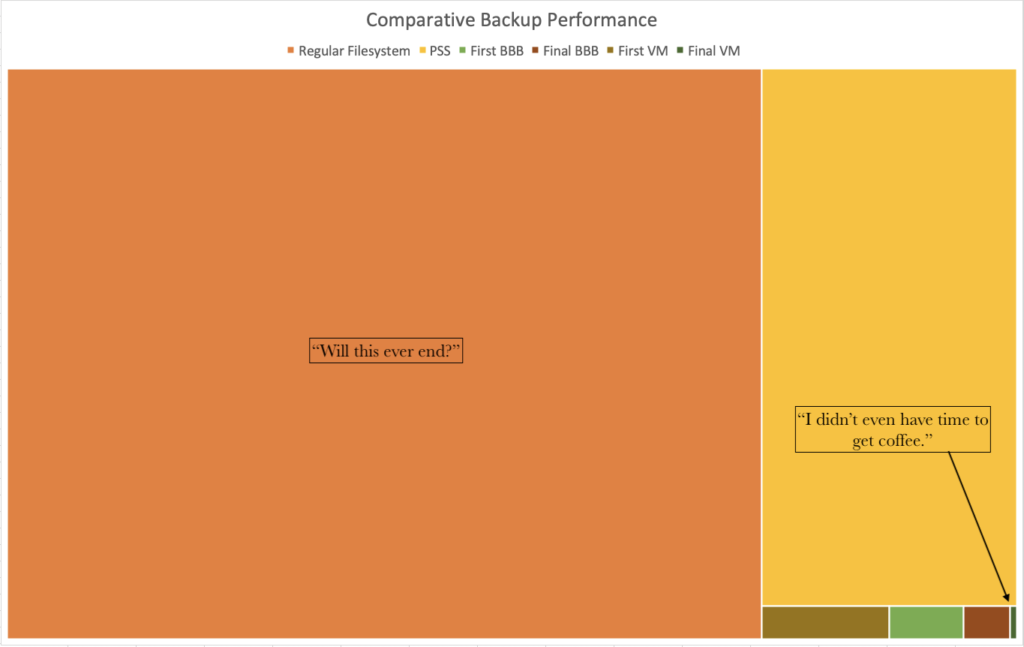
By rounding the minutes up in each case, I was able to shrink the backup performance down from 2,444 minutes to 2. With BBB I’d been happy enough getting a backup that ran under 1% of the original time – with image-based backups that window came down to around 0.05% of the original time.
While I’ve run these tests on NetWorker, the great thing to keep in mind here is that Avamar obviously also does image-based backups, and PPDM can do image-based and block-based backups. No matter what product you’re using, there’s going to be a way to make a massive impact on the performance of ultra-dense filesystem backups.
Great article. You say the standard backup takes two days, sixteen hours and 43 mins. That is not 40 hours and 43 minutes. Have I missed something? Your time gains may be even better….
That’s a good point – as always I’m terrible with math juggled those numbers. So yes, you’re quite correct – it’s an even better gain. Thanks for pointing it out – I’ll adjust the article accordingly.
Hi, Preston.
Thanks for great article!
Do I understand correctly that in the case of a standard backup, we can restore a separate file quickly, since we have an index, and in the case of BBB and vmdk, we will have fast backups, but slow recovery?
Thanks!
BR,
Sergey.
Hi Preston, are there any suggestions you have for Avamar tuning when dealing with dense filesystems?
Great article. I’ve been using BBB with Windows and Linux based clients for sometime to alleviate long backup times. But what about a client that’s NDMP based? For instance NetApp or Dell EMC storage like VNX.
Great article Preston. I would be interested to know how an Avamar file system backup compares with the same data on the initial full and the 2nd backup with changed data.
Hi Sergey,
BBB is a reasonably high-speed recovery as it’s just a “mount and copy”. Similarly, VMDK recovery can be very quick: FLR from an image-based backup can recover thousands of files very quickly, and if you wanted to restore significant chunks you could do an “instant access” and copy the data across, for instance.
Cheers,
Preston.
Hi Mike,
There’s a few good support articles on tuning Avamar filesystem backups that are worth searching for (I don’t have them handy, sorry). I’m running some Avamar testing at the moment.
Cheers,
Preston.
Hi, Tomas,
I’m running some Avamar filesystem backup testing at the moment, and will likely do some follow-up posting next week/when time permits.
Cheers,
Preston.
Hi, Carl,
For some NDMP systems, there’s the option for doing a block-based backup — it really depends on the NDMP implementation/options. They can obviously create a large speed-up.
Funnily enough, in my home lab, I have several multi-TB filesystems running on Synology NAS platforms. Obviously that doesn’t support NDMP, so I do PSS backups against NFS mount-points presented to my backup server. The PSS backups definitely create substantial performance improvements – I went from say, a 14-16 hour backup for the largest filesystem down to about 4-6 hours by enabling PSS.
In terms of NAS, it’s a case of carefully looking into the options available for each platform. The other way NetWorker can help is that it can have “combined” policies that perform both snapshot management and rollover to NDMP backups. So with things like Unity and NetApp, for instance, NetWorker can trigger say, regular snapshots throughout the week, with the Friday 6pm snapshot written out as an NDMP backup. This gives a good mix of rapid and operational recovery options.
Cheers,
Preston.
Hi Preston
Have you bench marked the clone performance based on the above scenarios? NVP clone and BBB clone. As I understand it NVP clone is single threaded, and for BBB if parallel streams are enabled you get parallel clones. Asking as I am facing clone performance issues with NVP backups and BBB backups (no parallel streams) and would like to run a small POC to validate these performance settings in our environment.
I’ve not done any cloning performance comparison, but they’re good things to test out.
But what if the customer asks for a file that was somewhere on the system sometime within the last three months?
How do you search for this efficiently without metadata i.e. indexes?
PowerProtect Data Manager will be your best option there; it is able to index block based backups.