Intro
One of the things I’m keen to try in NetWorker 18.1 is the new Orchestrated Application Protection (OAP) feature of NMDA, but in order to get to the point of testing that, I had to first do some configuration around BoostFS. BoostFS has been around for a while, of course, but it’s just been one of those things that has been sitting on my TODO list for ages: something else always pops up.
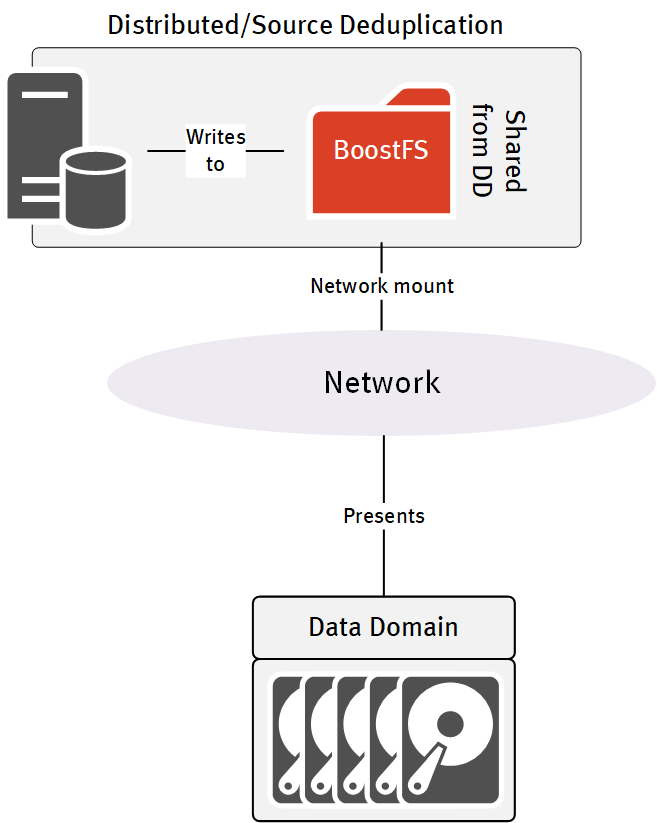
Now, if you’re not familiar with BoostFS, here’s a quick overview: while it’s always desirable to have a full client/agent available for anything you want to protect, sometimes that’s not going to be possible. New databases for instance, are emerging on the market regularly, and there’s a depressing number of databases where the developers don’t give any real consideration towards backup – they literally only provide an option to dump the live database: nothing in any way more substantial than that. Rather than trying to invent an agent for every conceivable database that comes onto the market, BoostFS gives you the option of mounting a share (over Boost, not NFS or CIFS) directly from the Data Domain to the host you need to provide some form of agentless backup for. You can then write data to this mounted directory while getting all the benefit of source side deduplication. In short, this:
Since OAP leverages BoostFS, I wanted to make sure I could get a basic BoostFS connection running for my environment before I went on to testing out OAP.
To get BoostFS installed, and on a system that I could subsequently run some OAP testing with, I spun up a new Linux virtual machine. (While BoostFS is now available for Windows as well, I’m still a Unix sysadmin at heart, so my tests will always run towards Linux/Unix ahead of Windows, unless absolutely necessary.)
The sequence for getting BoostFS enabled and running for a system is as follows:
- Get Boost configuration complete on the Data Domain
- Install the Boost Plugin on the system that’ll be mounting a Boost storage unit from the Data Domain
- Configure the Boost Plugin, including security settings
- Mount the device
- Go nuts with the awesome potential of BoostFS!
The last is entirely optional, of course, but I personally think BoostFS is pretty cool, so to me, that last point is pretty justified.
Boost configuration on Data Domain
If you’ve configured a Data Domain for Boost connectivity in any other scenario, you’ll see that this is pretty similar in terms of requirements.
First, make sure the filesystem is running on the Data Domain:
sysadmin@neutronium# filesys status
The filesystem is enabled and running.
Next, make sure Boost itself is enabled:
sysadmin@neutronium# ddboost status
DD Boost status: enabled
(Of course, if it isn’t, do the old “ddboost enable” to enable it.)
You also want to make sure distributed segment processing is enabled – without that, the entire point of BoostFS is pretty much useless. To check on that, run:
sysadmin@neutronium# ddboost option show
Option                         Value
------------------------------ -------
distributed-segment-processing enabled
virtual-synthetics             enabled
global-authentication-mode     none
global-encryption-strength     none
------------------------------ -------
Now, next you need to make sure you’ve got a Boost user. That’s something I already had, since the Data Domain in question is being used by NetWorker. You can have multiple Boost users, and if you’re going to be handing out Boost access/storage units to multiple teams, that’s a very good security approach, anyway. In my case, it’s just me in my lab, and I tend to trust myself, so I stayed with the same Boost user account, and was able to move on to creating a storage unit:
sysadmin@neutronium# ddboost storage-unit create BoostFSMidkemia user boost
Created storage-unit "BoostFSMidkemia" for "boost".
You can confirm the storage unit is available using the ‘show’ command, viz.:
sysadmin@neutronium# ddboost storage-unit show
Name            Pre-Comp (GiB) Status User Report Physical
                                              Size (MiB)
--------------- -------------- ------ ----- ---------------
StorageUnit1               0.0 RW     boost               -
orilla                  1924.0 RW     boost               -
BoostFSMidkemia            0.0 RW     boost               -
--------------- -------------- ------ ----- ---------------
D     : Deleted
Q     : Quota Defined
RO    : Read Only
RW    : Read Write
RD    : Replication Destination
There’s some other options around configuring client groups, logical stream limits, etc., but I didn’t need to worry about that for my configuration and was able to move on to the next step.
Install the Boost Plugin on the Host
You’ll need to download the relevant Boost client first. The product page (including downloads and documentation) can be found on the support website, here. Download the version that’s right for you, and install it via the standard OS methods. For me, that was as simple as:
[root@midkemia ~]# rpm -ivh DDBoostFS-1.2.0.1-595646.rhel.x86_64.rpm
Preparing... ########################################### [100%]
(Rest of output removed.)
For Linux, you’ll need to ensure you have the fuse and fuse-libs packages installed, as well. They’re prerequisites of BoostFS on Linux. (After I installed the plugin, I also edited my root user’s .bash_profile to add /opt/emc/boostfs/bin to the execution path.)
Configure the Boost Plugin
If you go into the /opt/emc/boostfs/etc directory, you’ll find a sample boostfs.conf file. You can either choose to edit this file to suit what you need to do, or create it from scratch, following the installation guide. I chose to create it from scratch, and my resultant file looked like the following:
[root@midkemia ~]# cat /opt/emc/boostfs/etc/boostfs.conf
[global]
data-domain-system=neutronium.turbamentis.int
storage-unit=BoostFSMidkemia
lockbox-path=/opt/emc/boostfs/lockbox/boostfs.lockbox
log-enabled=true
log-level=info
log-dir=/opt/emc/boostfs/log
log-file=output.log
log-maxsize=100
log-rotate-num=4

[/neutronium/boostfs]
data-domain-system=neutronium.turbamentis.int
storage-unit=BoostFSMidkemia
security=lockbox
mtboost-enabled=true
mtboost-threads=16
max-connections=128
BoostFS can authenticate in one of two different ways: lockbox, and Kerberos. I chose to use the lockbox format, which required the following commands to setup:
[root@midkemia etc]# boostfs lockbox set -u boost -d neutronium.turbamentis.int -s BoostFSMidkemia
Enter storage unit user password: frozenWeaselsTasteFunny
Enter storage unit user password again to confirm: frozenWeaselsTasteFunny
Lockbox entry set
(No, that’s not really the password I used, and I’m sorry if I’ve picked your random password there.)
The Lockbox can be shared amongst multiple hosts. I only wanted to use it on my current host, but to be on the safe side I ran the host access command as well:
[root@midkemia etc]# boostfs lockbox add-hosts midkemia
Lockbox add host(s) completed
In the configuration file, I’d specified that I’d be mounting the storage unit I’d created at /neutronium/boostfs, so that had to be created:
[root@midkemia etc]# mkdir -p /neutronium/boostfs
With this all done, I was ready to mount the filesystem:
[root@midkemia etc]# boostfs mount /neutronium/boostfs

mount: Mounting neutronium.turbamentis.int:BoostFSMidkemia on /neutronium/boostfs

[root@midkemia etc]# df -h
Filesystem            Size  Used Avail Use% Mounted on
/dev/mapper/vg_midkemia-lv_root
                       21G  3.0G   17G  15% /
tmpfs                 939M     0  939M   0% /dev/shm
/dev/sda1             477M   69M  384M  16% /boot
boostfs               354G   19G  335G   6% /neutronium/boostfs
There you go!
Go Nuts with the Awesome Potential of BoostFS
Right, once you’ve got the filesystem mounted, you may want to make sure that you’re really getting distributed segment processing taking place – i.e., getting client side Boost running. This is actually pretty straight forward – all you need to do is copy some files into the mount point while watching your stats on the Data Domain.
To test this out, I created a tar file of /usr on the server, as /tmp/usr.tar, and prepared to copy that into the mounted Boost directory.
[root@midkemia ~]# du -hs /usr
2.2G /usr
[root@midkemia ~]# tar cf /tmp/usr.tar /usr
tar: Removing leading `/' from member names
tar: Removing leading `/' from hard link targets
[root@midkemia ~]# du -hs /tmp/usr.tar
2.1G /tmp/usr.tar
(That’s not compression, that’s just tar being a bit more efficient on storage given it’s lumping all the content into the same file.)
Now, to monitor the Boost protocol in action, I opened a ssh session onto the Data Domain server as the ‘sysadmin’ user, and prepared to run the following command:
sysadmin@neutronium# ddboost show stats interval 2 count 100
The goal was to run that command while the copy was taking place, the copy command being:
[root@midkemia ~]# cp /tmp/usr.tar /neutronium/boostfs/
So nothing special there – I’m not trying to do anything fancy, I just want the file copy to take place. While the copy was taking place, this was the output from the “show stats” command. (Note that the spacing is exactly per the output of the command, pasting it into the blog window removes all spaces and I’ve got to manually add them back in!)
sysadmin@neutronium# ddboost show stats interval 2 count 100
07/30 01:01:18
Backup          Post-comp       Network         Restore         Network         Backup  Restore
KB/s            Written KB/s    In KB/s         KB/s            Out KB/s        Conn    Conn
--------------- --------------- --------------- --------------- --------------- ------- -------
              0               0               0               0               0       0       0
          5,817             280             280               0               0       1       0
         48,360           7,039           7,041               0               0       1       0
         77,083           6,045           6,047               0               0       1       0
         73,787           7,237           7,239               0               0       1       0
         56,310           2,178           2,178               0               0       1       0
<snip>
         50,389           6,846           6,847               0               0       1       0
          1,654             343             343               0               0       0       0
              0               0               0               0               0       0       0
^C
Hang on, what witch-craft is that? This is the first copy, and I’m already getting deduplication? Well, there’s a couple of reasons of course – deduplication starts from the first chunk of data you send to a Data Domain, of course, but even more so in this case, I’ve been using this Data Domain for NetWorker backups of Linux systems, so a lot of data it’s seeing here (given tar does not compress) is the same as content it already has on the system. And because deduplication is global, it doesn’t matter that the content has already been stored by NetWorker.
In fact, we can check on what sort of deduplication we achieved:
sysadmin@neutronium# ddboost storage-unit show compression BoostFSMidkemia

List of files in BoostFSMidkemia and their compression info:

usr.tar:
Total files: 1; bytes/storage_used: 5.1
       Logical Bytes:        2,201,384,960
      Original Bytes:        2,208,642,332
 Globally Compressed:          799,457,063
  Locally Compressed:          427,029,578
           Meta-data:            3,330,296
And to prove the point, I copied the file again, giving it a new filename on the Data Domain, resulting in the following stats (abbreviated, again):
sysadmin@neutronium# ddboost show stats interval 2 count 100
07/30 01:13:35
Backup          Post-comp       Network         Restore         Network         Backup  Restore
KB/s            Written KB/s    In KB/s         KB/s Out        KB/s            Conn    Conn
--------------- --------------- --------------- --------------- --------------- ------- -------
          7,768               0               0               0               0       1       0
         71,879               0               0               0               0       1       0
         69,936               0               0               0               0       1       0
         67,928               0               0               0               0       1       0
         69,935               0               0               0               0       1       0
And that’s really all there is to it. With that effort, I’ve got a source-side deduplication mount point from my Data Domain, ready for database dumps, file copies, etc. Of course, BoostFS isn’t about replacing say, a NetWorker or Avamar client, but it will give you an option when you need to provide protection for something more esoteric than a conventional client – e.g., a NoSQL database, etc.
I’ll be leveraging the install I’ve done here in an upcoming blog post when I try out OAP – stay tuned for that.
I need to download Bootfs 7.9 for testing purposes to integrate it with Nakivo backup and replication
The BoostFS landing page is here: https://www.dell.com/support/home/en-au/product-support/product/data-domain-boost-file-system/overview
You may need an account to download the BoostFS software.