
I admit, when I first encountered Avamar, some of my first impressions were a little jaded by my lengthy experience with NetWorker and other products.
Whereas NetWorker has a very rich set of command line options, particularly on the client, Avamar only has a few. But the difference between the two is that Avamar’s few command line tools on the client are packed with a rich gamut of options.
Avamar Restore Options
There are a few standard options that you might use for an Avamar restore:
- A database-integrated plugin, directly on the client (e.g., Avamar embedded in the Oracle RMAN utility)
- A GUI restore (either the new web-based AUI or the Java console)
- From the command line on the client using avtar.
I might have previously split out options around vCenter/VMware restore processes. However, these now plug directly into the AUI anyway, so they’re just another variation of the AUI restore scenario.
(In addition to the above methods, you can also access Avamar restores via the REST API, which is leveraged to excellent effect in extensions such as the vRealize Automator and vRealize Orchestrator plugins.)
GUI-based restores are easy enough to navigate via the GUI, particularly now with the Avamar UI. But it’s worthwhile knowing how to make your way around a command line restore.
Aside: Setting up a User Account for Restores
In a normal Avamar environment, you’ve probably got a plethora of different user accounts setup (either integrated into Active Directory, or as direct Avamar accounts). I had never got around to configuring additional accounts in my Avamar lab environment, and I think you ought to avoid using the MCUser account for client initiated recoveries. (Because individual users/administrators on clients are unlikely to be trusted with the root credentials for Avamar.)
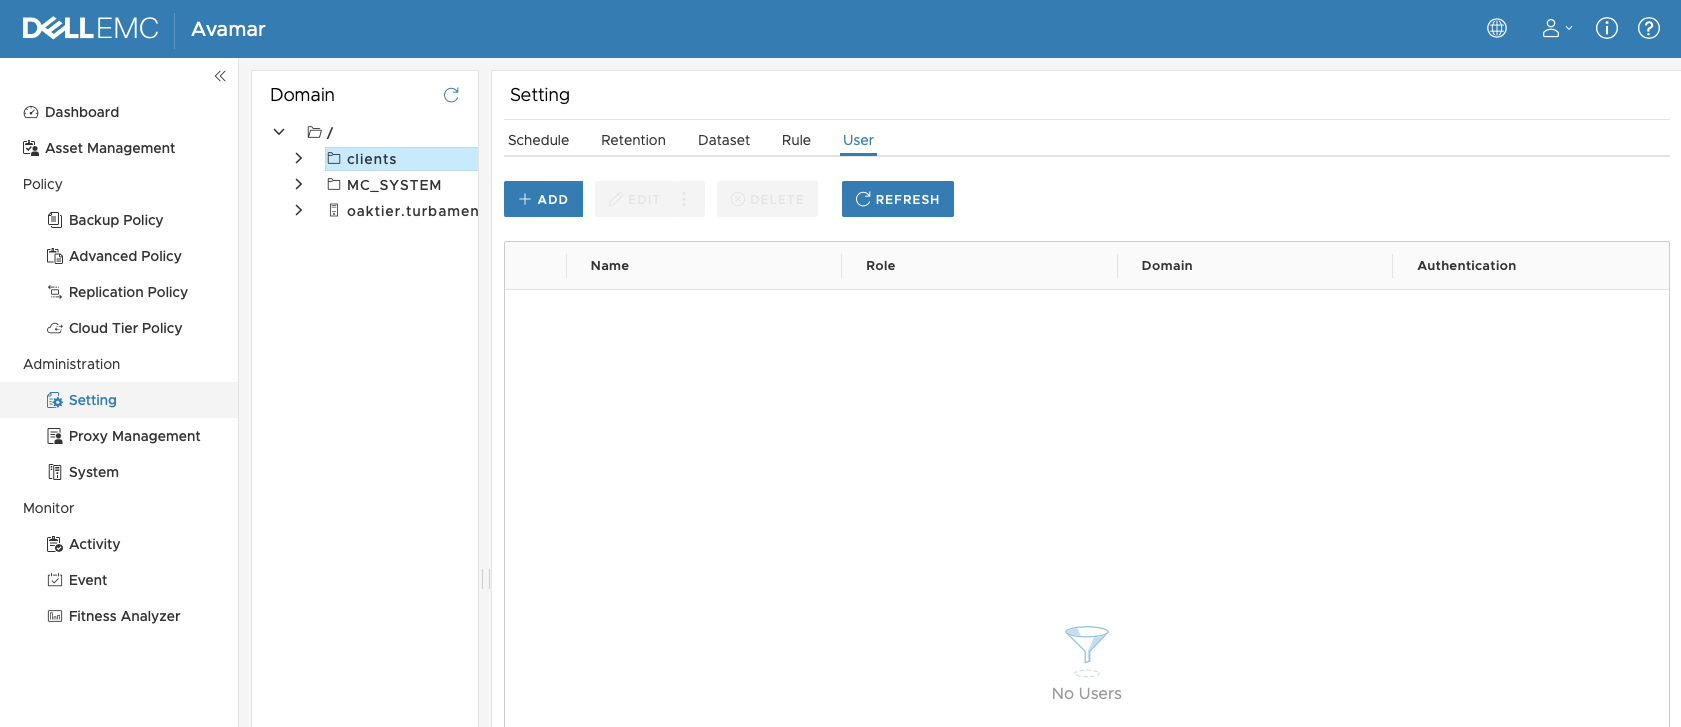
So as a precursor to this, I decided to create a new account in Avamar I’d be using for this process. To start the process, I went to Administrator > Setting under the AUI. From there I selected Setting > Users in the main window, and because I didn’t want a new account that could administer the entire server, I chose the clients domain:
I clicked +Add to add a new account and filled in the desired details:
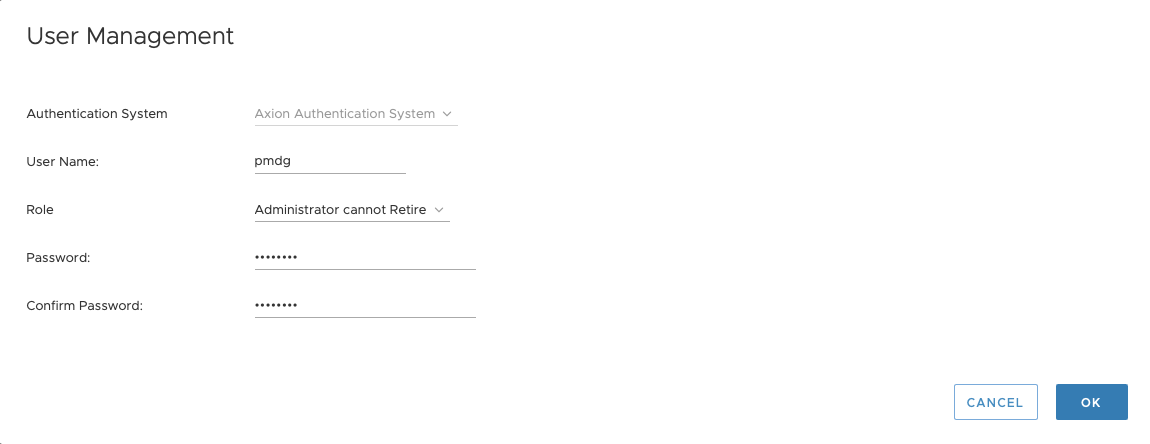
The role I chose for my user account was ‘Administrator cannot retire’, which is, as you may have guessed by the name, an Administrator user that can’t retire clients. In actual fact, I only needed to create a Restore-enabled user, but I figured I’ll use this user account elsewhere so gave it a bit more oomph.
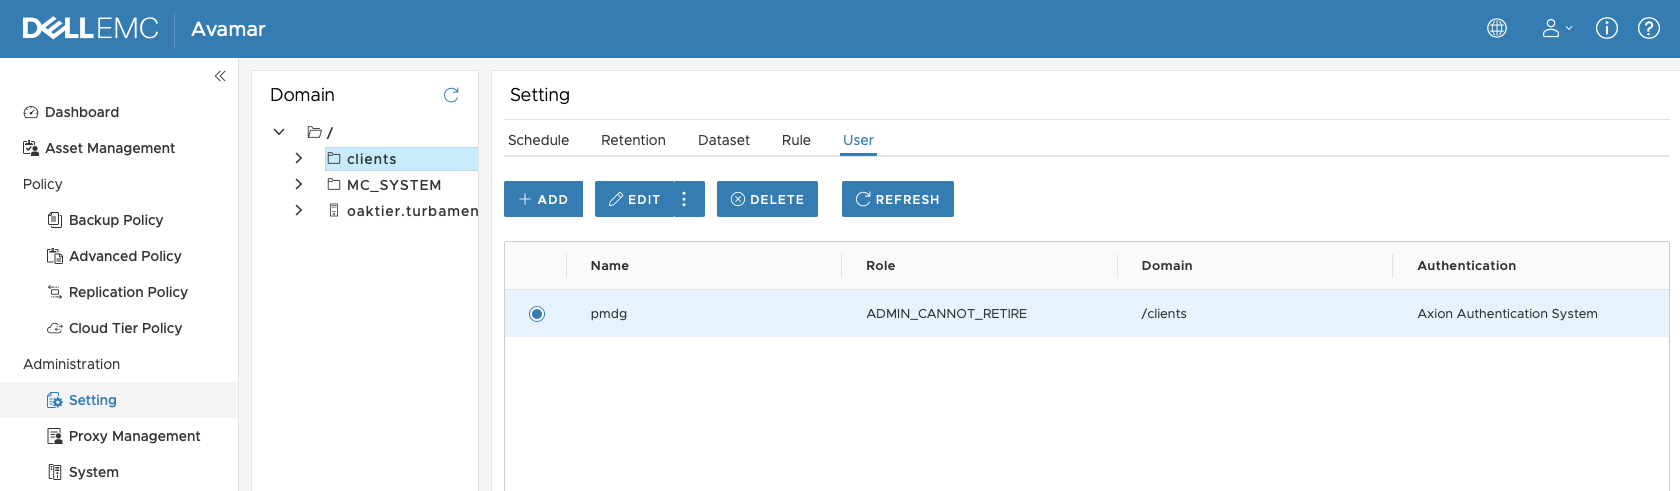
After I filled in the details and clicked OK, the User Settings updated to show my new account:
So that’s the account created. Next up – using it to do a restore.
Getting Acquainted with avtar
If you’re at all familiar with Unix and Linux platforms, you’ll have no doubt guessed that avtar is a little modelled on the Unix tar command. The avtar command takes most command-line options via the long-form method – i.e., a whole word preceded by a minus-minus. (There are some variations, but the majority of options will use a ‘–‘).
The first variant of avtar you’ll want to familiarise yourself with is –help:
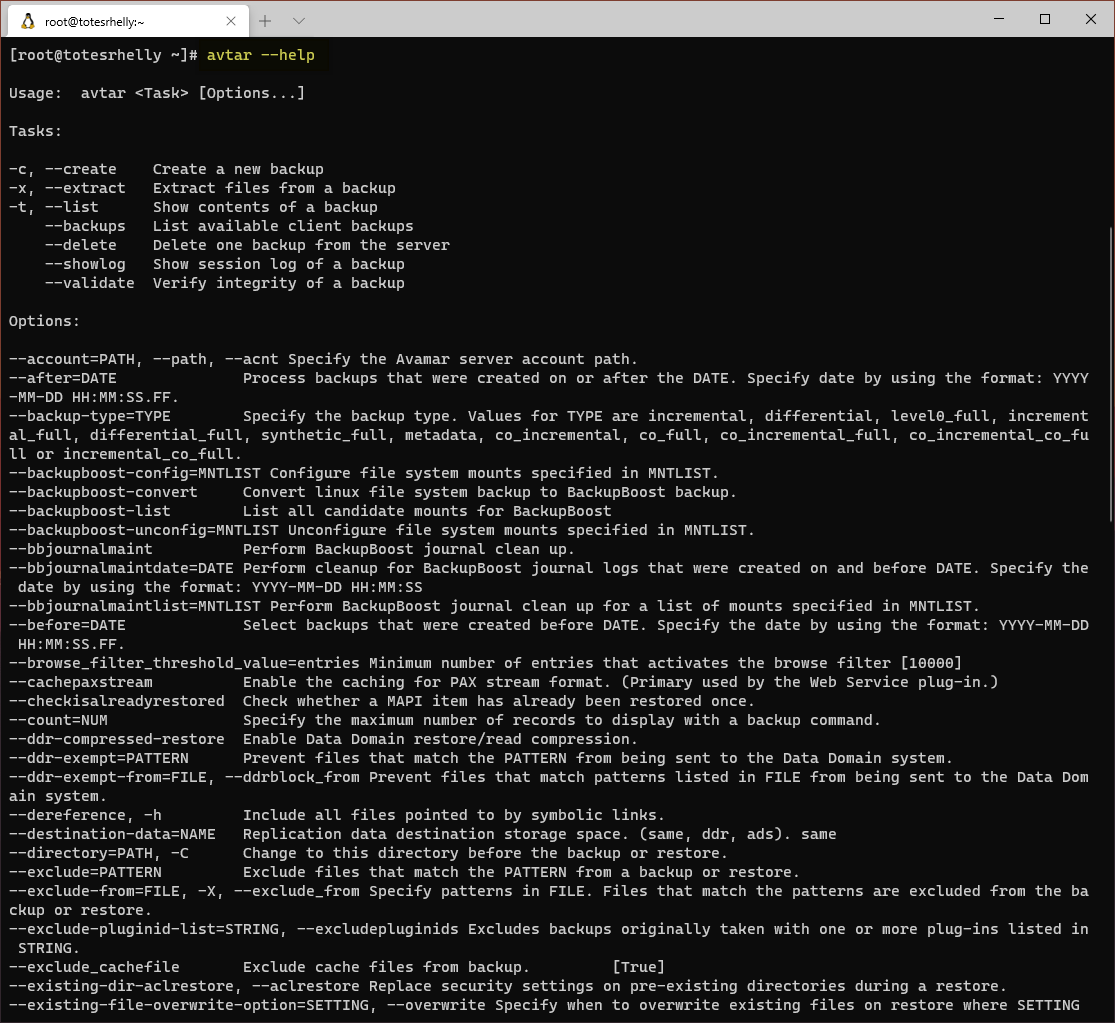
This will produce a rather lengthy amount of information, so either pipe it to more or be prepared to scroll back up. Details are broken into two key categories:
- Tasks – What you’ll want to do with avtar, and
- Options – How you set granular controls on the tasks you run with avtar.
Taking a closer look at the tasks, you’ll see you can use avtar to:
- create – Make a new backup
- extract – Pull files out of a backup (i.e., restore)
- list – List the contents of a backup
- backups – List backups
- delete – Delete a backup
- viewlog – Show the logs for a particular backup
- validate – Validate a backup
Each of these tasks are useful, of course, but in this post we’ll concentrate on options around restoring from backups.
Using avtar to find the backup you want to restore from
So your first step will be to list the backups available for the host you want to restore data for. This will be via avtar –backups.
Now, when you intend to talk to an Avamar server with avtar (pretty much any time other than just running avtar –help), you’ll need to authenticate, and you’ll likely need to specify a host path you want to work on. You can bundle the password on the command line, but for my examples, I’ll be typing in the password each time.
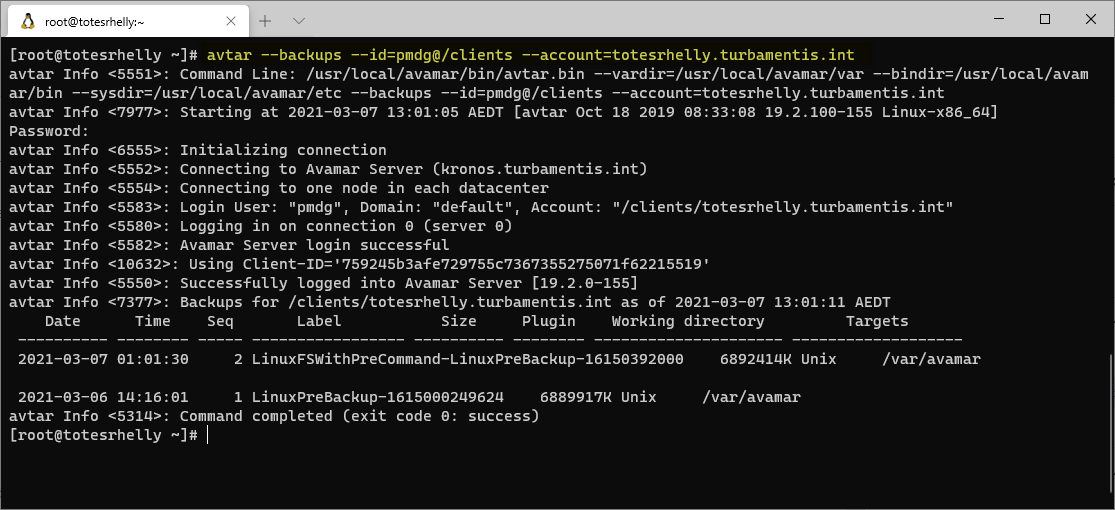
So here’s the command I used:
# avtar --backups --id=pmdg@/clients --account=totesrhelly.turbamentis.int
(All one line.)
You use the ‘–id’ option to authenticate an account name. In this case, because the account I created wasn’t in the root domain for Avamar, I had to specify the account name and the account domain. So, that was ‘pmdg@/clients‘, meaning “User ‘pmdg’ in the ‘/clients’ domain”.
You also have to tell avtar the account you want to use it against. Within Avamar and avtar in particular, the account refers to the host or client name whose backups you want to interact with. For my example here, the account is ‘totesrhelly.turbamentis.int’. (Note that I didn’t have to specify the /clients domain here. I’ve specified /clients in my id.)
Running the command gives me a list of all the backups for the nominated account, including details including but not limited to:
- The backup label
- When the backup was generated
- The size of the backup
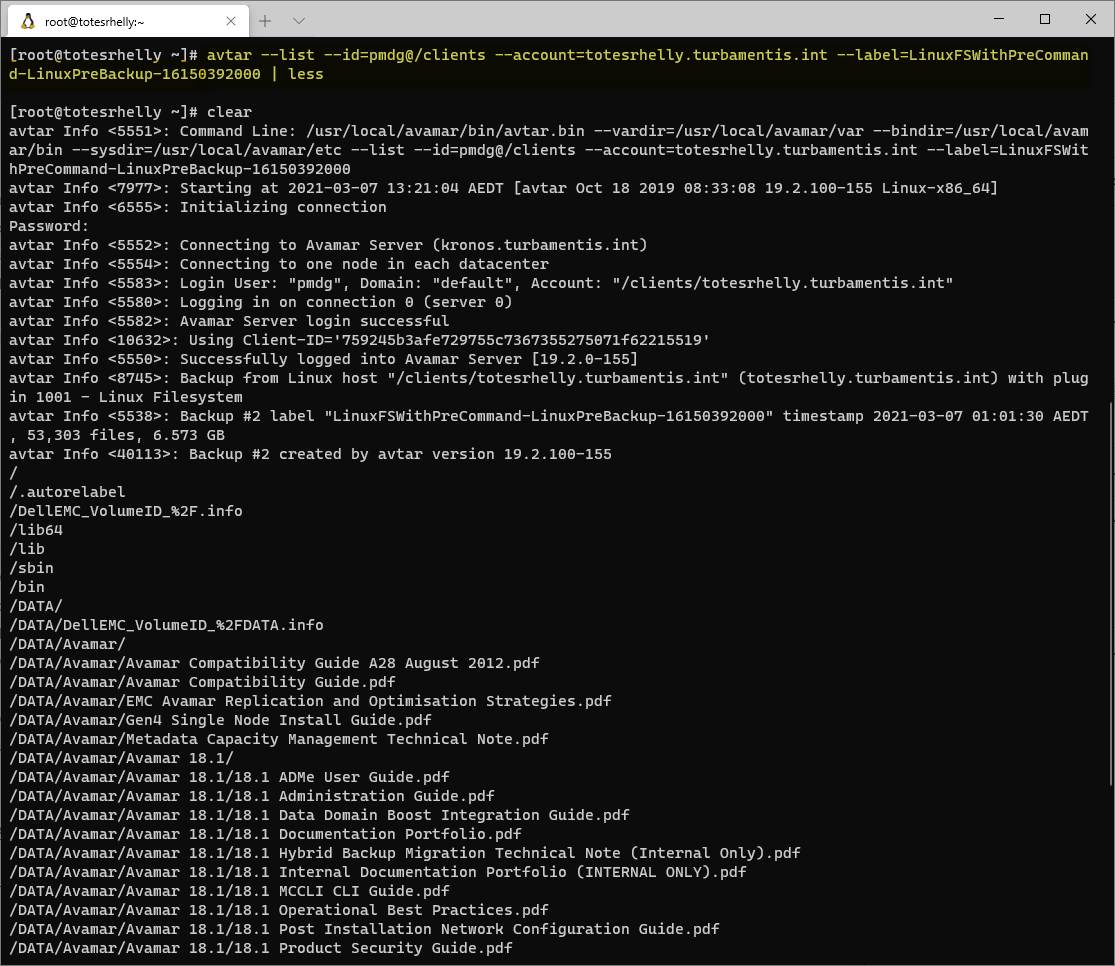
Using avtar to list the contents of a backup
Sometimes you’ll know exactly what you want to restore from a backup, but sometimes you’ll want to query the content of a backup to see if it has what you want. (Remember that since each Avamar backup is full, any backup you query will present you that full filesystem view you might know and love from NetWorker’s ‘recover’ command.)
If I wanted to list the contents of the second backup (top of the list of two backups, sequence #2), I’ll want to grab the backup label to run the backup listing, and my command will look like the following:
# avtar --list --id=pmdg@/clients --account=totesrhelly.turbamentis.int --label=LinuxFSWithPreCommand-LinuxPreBackup-16150392000
I added a “| less” to the end of the above command so I could pause the output for a screen capture. (When you do that, the command may appear to hang, but in that scenario it’s just Unix/Linux buffering while avtar prompts you to enter your password.)
Using avtar for a command-line restore
So far we’ve looked at:
- How to list the backups
- How to list the contents of a backup
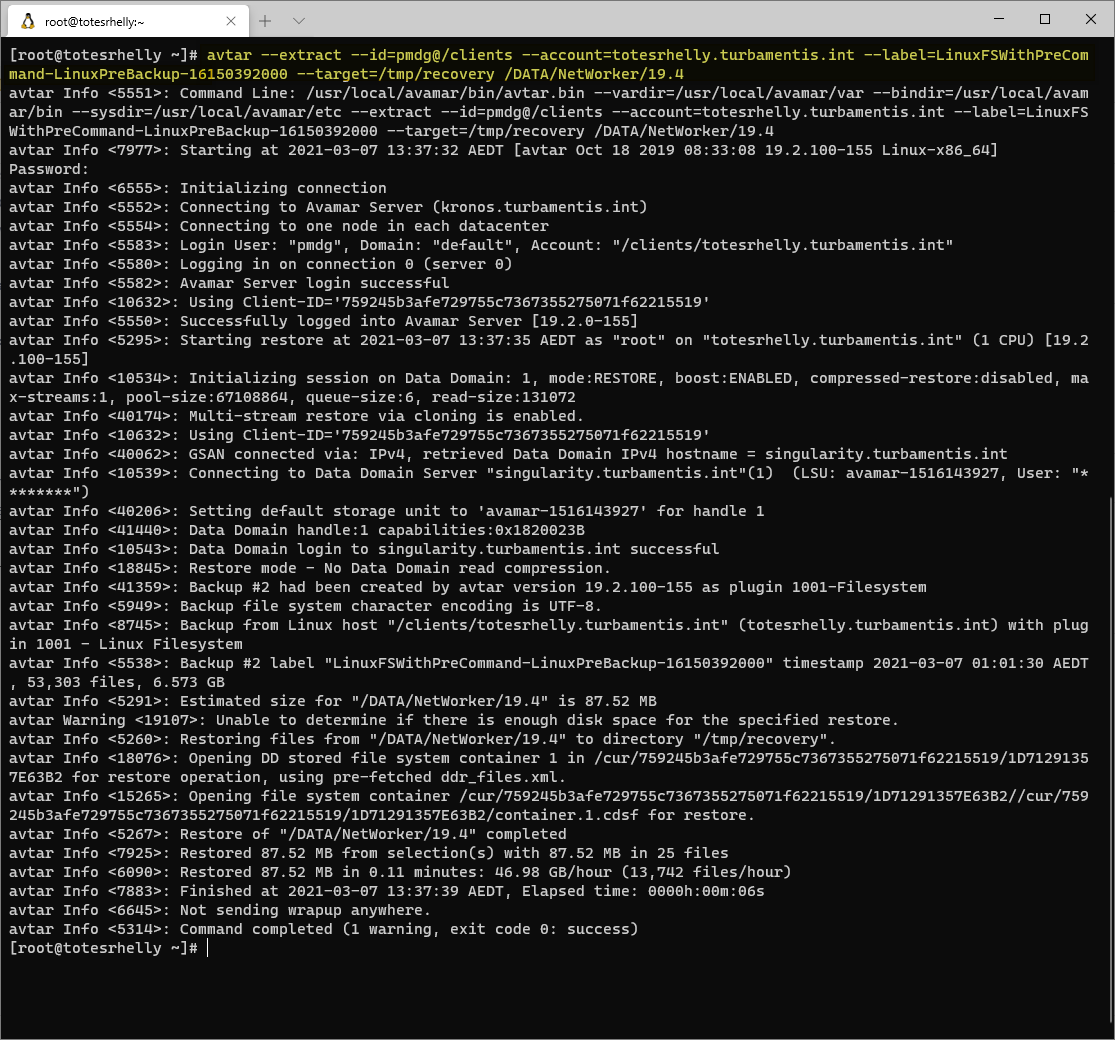
Now we’re ready for the main event – how to restore files from a backup. There are a lot of different restore options, but I’m going to keep it simple. In this scenario, I want to recover the path /DATA/NetWorker/19.4 to /tmp/recovery from the backup I previously listed above. That makes the command line as follows:
# avtar --extract --id=pmdg@/clients --account=totesrhelly.turbamentis.int --label=LinuxFSWithPreCommand-LinuxPreBackup-16150392000 --target=/tmp/recovery /DATA/NetWorker/19.4
The new CLI options I’m using here are:
- –extract to restore
- –target to specify where I want to write the restored data to, and
- fileSpec – The file path/spec to apply for matches for restoration – in this case, ‘/DATA/NetWorker/19.4’.
So, here’s what the restore looks like in action:
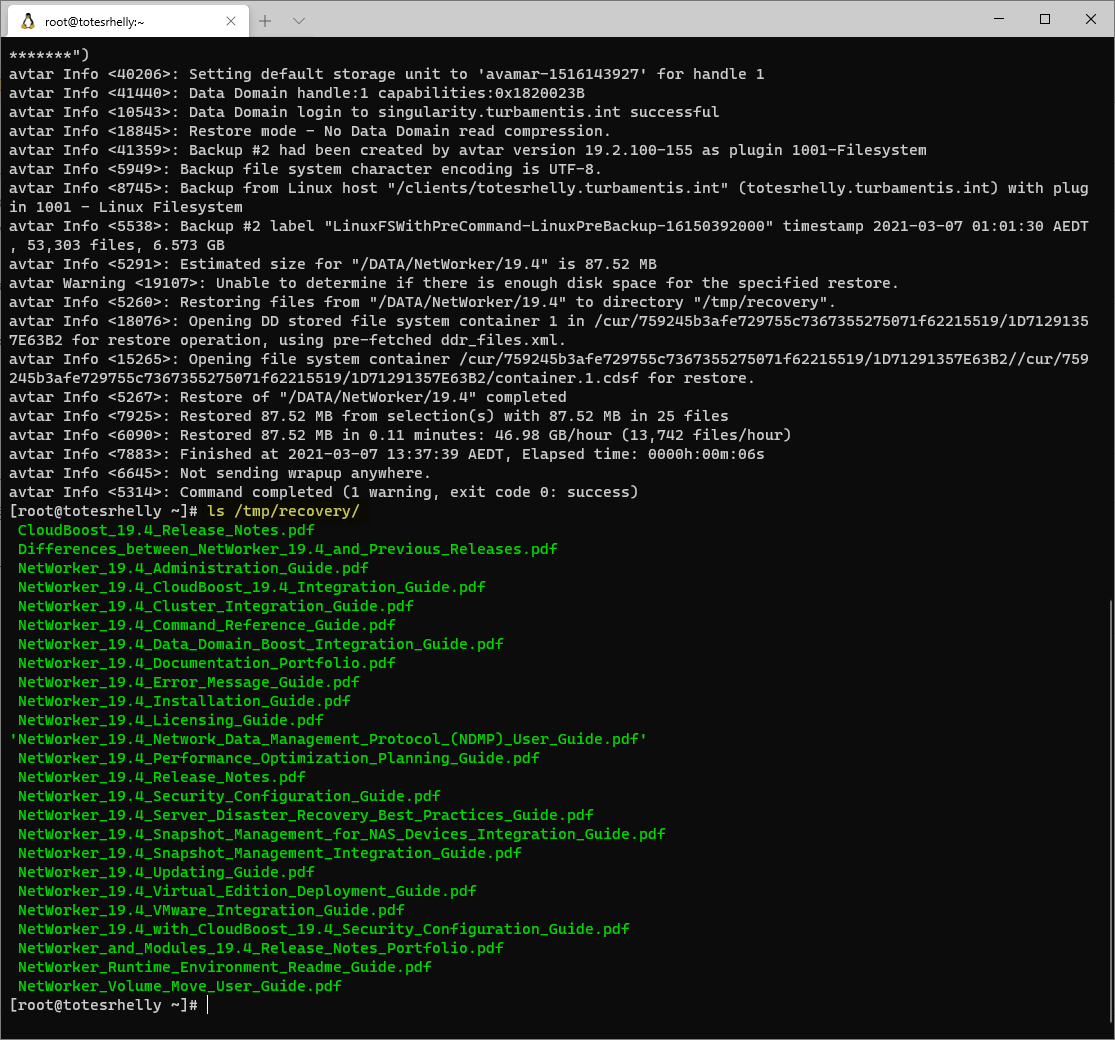
With the restore complete, I did a quick directory listing to confirm the results of the operation:
Wrapping up Avamar command line restores using avtar
As I mentioned earlier – the avtar command has a lot of options to it, and even in terms of finding backups and running restores, I’ve really only touched the top of it with this article. But always keep in mind that avtar is a powerful option available to you to run Avamar restores.